Welcome to the Workshop Series brought to you by


Funky Junk Interiors and Mustard Seed Creations!
All 'Creating your own Workshop' posts are HERE.
If you're ready to learn a few new tricks that will enhance your DIY world, you've come to the right place!
Today Miss Mustard Seed is leading Part 1 of her decorative painting seminar. She's going to guide you through all the steps of getting set up so you too can give it a whirl. You don't want to miss it!
Let's get started with Funky Junk's series,
Creating your own Workshop
Part 1 ~ Choosing your location

Welcome to my garage!
NOT.
Ready? Brace yourself. And promise to still like me, OK?


Stop laughing. You'll give me a complex.


(Ugh. I look as good as my garage)
When I first moved into my current home, I didn't have a 'garage'. I was blessed with a WINE CELLAR. (and I don't even like wine.) The first step was to obviously rip out what was there and start with a clean slate again. If you look at the above pics, some work has already been done. Basic cabinets, pegboard, lighting, a heatsource and an insulated new garage door was installed for a great start.However, if one doesn't maintain our work spaces, it just becomes an unproductive holding tank for your junk. The mess above resulted over the Christmas holidays when I was renoing and decorating under a deadline. And the aftermath is not pretty!
So, I'm going to take you along for the ride. This mess WILL be organized, to help encourage you to follow along and create your own productive space along with me!
What's this? You don't have adequate space for a workshop, so this seminar can't possibly apply to you? Ohhhh, not so. Whether you live in an apartment or on 10 acres, if you desire a work area for your DIY projects, this seminar is most definately for you!
How to create a workshop
1. Pick your spot.
2. Purge
3. Determine your needs.
4. Search for inspiration and ideas
5. Develop your plan
6. Go shopping
7. Install
Waaay too much to cover in one shot. So let's start today with,
~ 1. Pick your spot. ~
You may think a garage is the obvious choice for a workshop. In my case it is, however it may be different for you. Perhaps you have a vehicle swallowing every square inch of your own garage, or worse, no garage at all. What then?
Many a day I've laid out blankets in the middle of my kitchen to do some painting. I also have a basement where I also do some of my work.
Anywhere you chose can be labeled your work area. Now all you have to do is make that choice, so you can set things up right.
Areas to consider
main living area
spare room
basement
garage
outdoor shed
someone else's shop area
No space? What then?
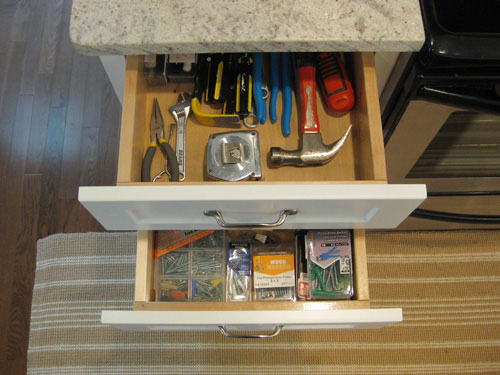
I sincerely believe you can have a workshop if you have even just a closet, spare room, or even a simple drawer. The following pictures show some wonderful space friendly solutions. Just replace the contents with the tools of your personal choice and you'll have everything right at your fingertips ready to DIY on the run!
Below images found at Room Remix
(the following pics will be rightfully linked to their original owners shortly)

A suitcase or tool kit

Wall shelf system

Armoire, heavily utilizing the inside of the doors as well
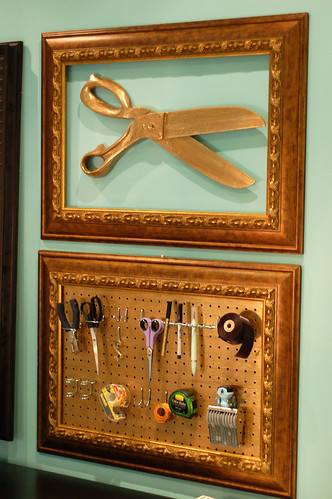
Peg board no larger than a picture

A spare closet

Convinced?
Me ~ "So Miss Mustard Seed, what kind of workshop area you do have available to you?"MMS ~ "I am very fortunate to have about 900 glorious square feet of workshop in my basement. One little snag - I share the space with my wood working hubby, That's a great thing and a bad thing. It's great because he builds things and fixes things for me, the bad thing is that he's a little messy. He also just got a lot of new tools and total upheaval has come with those new tools. I'm looking forward to following some of your advice, Donna."
Me ~ "You do alot of spraying on your furniture. How do you deal with the ventilation issue?"
MMS ~ "My spray booth is currently built right in front of my basement doors. When I spray, I simply open the doors and turn on a fan. This keeps the air moving and the fumes to a minimum in the rest of the basement. I wrote a post about my spray booth on Monday, so check it out if you want more detail."
~ This week's homework ~
Delegate a special area you'd like to set up for your workshop
Print out the following list and walk through your home. Consider:
Areas
main living area
spare room
basement
garage
outdoor shed
someone else's shop area
Features
lighting
heat
ventilation
cleanliness
storage
enough space to work
For tighter spaces, consider
tool cases
drawers
closets
armoires
shelves
wall mounted storage
collapsible tables and chairs
tables/storage on wheels
Next up - Purging
I heard that groan. (or maybe it came from me) I'm going to take you along for my own purge ride. Weee! You'll be shown all the steps needed to get your stuff to the right destinations, so be sure to tune in next Wednesday to hopefully see some slight improvement. :)
So??? Are you going for it?
Fess up! What's your current workshop situation like? Fed up of tripping over tools and trikes? Why not roll up your sleeves and gut that back room, shed or garage along with me? Pretty please?!? I need your support. :)
Remember to take those before pictures! At the end of this series, we'll be having a before and after MckLinky event so we can share all the hard work we've accomplished!
After you leave your comment, make sure you head on down to Mustard Seed Creations for your first session on becoming a decorative painter. I'll meetcha down there. :D
So grab a button! Spread the word! For you too, are part of the Workshop Series!

No comments:
Post a Comment