Friday, July 31, 2009

XOXO

Hello!

I've made this card with a few challenges in mind.


The layout is from the sketch that Heidi’s provided for her Little Stamp Shoppe.

Stamp With Fun’s Challenge #17 this week is Pearls.

At Simon Says Stamp Challenge, their current challenge is LETS GET DISTRESSING !!

And wouldn’t you know it, Distressing is also the theme for Just Magnolia's Week 16 Challenge.


I've put some folds in Tilda's blouse. What do you think? I'm still trying to figure out where the highlights should be. Hmm...
I've gone pearl-crazy as you can see.
Did some heavy distressing, but in the picture the distressing looks lighter than in real life. The flowers are also distressed.

Here's the inside of my card, which took me a while longer to finished (this picture is posted on the next day. Had to have some shut eyes in between--LOL.)


A small announcement here. Kellie from Magnolia Down Under Challenges has asked me if I would like to stay on for another 6 months. Woo hoo. Of course I would!!! I am very honoured to be asked to join the DT ladies at MDUC. Thank you, Kellie. I feel humbled by this.

Thanks for stopping by. Enjoy your weekend everyone.

Stamp: Magnolia #214 Tilda with Hair Flower Garland, #501 Shabby chic fence, Hampton Art G Studio Kolette Hall Design hugs & kisses.
DP’s: KI Memories Pet Shop Yarn, Chatterbox Tangerine Gingham and Sunny Pinwheels.
Tools: EK Success border punch. EK Success retro flower punches (large & medium), Martha Stewart flower punch .
Embelishments: Making Memories metal XOXO, Kaisercrat Pearls yellow, Gartner Studios Brides ivory pearl.

It's Giveaway Time Again!


I had such a great time with my last giveaway let's do it again! This time it's pillows. Back when I selected the pale turquoise fabric for the slipper chairs I knew the sky blue in these four pillows would no longer work in the family room, so I set them aside for one of you!

These linen pillows from Pottery Barn have been customized with jewelry like rose and leaf buttons. To add a fun bit of pattern, two of the pillows have wraps made from a delightful Thomas Paul fabric found at Calico Corners.

To read about the project that personalized these pillows read the post Kitchen & Family Redesign - Almost Done. (Or so I thought, I am back to the drawing board when it comes to pillows for this space!)

Do you have a sofa, pair of chairs or a bed begging for a dose of color? Enter to win these pillows, valued at over $150, by leaving a comment on this post by the end of day, August 7th.

Would you like to increase your odds of winning? For one additional entry become an Isabella & Max Rooms follower. If you would like to beat the odds, for another additional entry blog about my give away and let me know you've done this in your comment on this post!


The winner will be selected by Random.org and announced in a post on August 8th. Good luck everyone! Janell


p.s. I am able to ship these items to a U.S. address only...thanks for understanding.

Who's Grading?

You may recall that I said I do not sew. Well actually, on occasion, I've been known to sew----for decorative purposes only. I think that I would probably sew more if it weren't for those horrid memories of Junior High Home-Ec sewing class. I remember unpicking more stitches than I sewed, or at least it seemed that way. I wanted my project (a cotton slip with lace and an elastic band waist) to be perfect so that I could get a good grade. Yes, I unpicked and unpicked and unpicked so much that I dreaded sewing and hated the finished product.
But lately I've been making some changes in my life. You see, I have spent my entire life only trying things if I first knew that I could do them well. I steered clear of experiences if I felt that I couldn't succeed.
But I have finally realized that I have held myself back from so many wonderful adventures in life. Why do I still feel, years and years after graduating from school, that I am being graded on my performance?
The real truth is,
I'm the ONLY one that's doing the grading!

Even if someone else comments on my performance, it's still MY CHOICE to let their opinion influence my life.
MY CHOICE!
And so, with those thoughts in mind, I pulled out the sewing machine, plopped my faded outdoor cushions on top of pretty fabric and got to work. About an hour later I proudly placed my newly covered cushions outside. I had a real feeling of accomplishment! Are the covers perfect? Let's just say that if I was being graded I would not get an A for quality. But I would get an A+ for effort----and that's really all that matters!
My family and friends will enjoy the new seating. It won't matter to them that the seams aren't perfect. They, and I, will appreciate the overall beauty and comfort of the cushions and the memories that we will make on our back patio.
I have the satisfaction of knowing that I created something beautiful. But even more, I have learned that life isn't about grades, it's about
learning,
making mistakes,
and realizing that making the effort
to learn and grow is when we
truly succeed.

Rakhi Wallpapers - Raksha Bandhan Wallpapers

Rakhi celebrates the beautiful and pious relation of a brother and sister. On this day, sisters tie red thread known as 'rakhi' on her brother's wrist as a bond of protection and also prays for his long life. In return to the holy thread, brothers promise their sisters to protect them from the World.

Rakhi or Raksha Bandhan is associated with the sentiments and emotions between childhood friends cum brother-sister who make their relation more strong by celebrating this day. Rakhi is observed on the full moon day of the shravan month according to hindu culture. So, for the coming Rakhi Festival 2009 on 5th August, we would like to introduce to our online visitors some of exclusive collection of rakhi wallpapers in 1024x768, 1280x1024 and 1280x800 resolutions. We wish everyone happy raksha bandhan and heartiest feelings for all and offer these wallpapers for free.
Rakhi Wallpapers Free Rakhi Wallpapers Download Rakhi Wallpapers

Thursday, July 30, 2009

From the Archives....A mini-tutorial~

On Vacation so here's a post FROM THE ARCHIVES...

This post originally appeared on August 21, 2008~

I have been wanting to decoupage something on a barn star for a long time. I have looked endlessly at scrapbook paper, but I just couldn't find the right thing. Then I remembered this beautiful toile wrapping paper my lil' sis wrapped my birthday presents in this year. When I saw it, I was instantly in love. I unwrapped my gifts very carefully and tucked the paper away waiting for the perfect project. And here it is...


I cut each section of the star's rays separately (next time I try this project, I'll only cut out one large diamond for each ray rather than two triangles) then Mod Podged them on. I sealed it with a coat of Mod Podge as well. It turned out beautifully and now hangs proudly across from my mudbench.

Happy crafting~

Get dirrty.

Sorry, I couldn't resist channeling Christina for a second. I have so many little projects I have wanted to share with you, but when I asked on Twitter -- the vote was for the outdoor project, so here. we. go.

This one isn't nearly isn't as fabulous as the deck, and again, I feel like I'm probably preachin' to the choir. I'm sure most of you already know these tricks, but I like to share with the group. I'm nice like that.

When you buy your hanging baskets or plants, you can make them look like a million bucks by just replanting them out of the cheap plastic containers and into your own.

OK, they won't like a million bucks, but maybe $20.

I showed you these planters for the deck from Goodwill last week -- a steal at $2.99 each:
I had a vision for them, so I spray painted them and then wasn't sure if I was going to plant anything for the rest of the summer/fall. Who was I kidding. Unfinished projects make me twitch. Shake. Shudder. Itch.

I found some beautiful plants for cheap and got moving. Most of the time, your decorative pots will have holes on the bottom, but if they don't, or if you'd like to put more in them, all you need is a drill and a large drill bit:

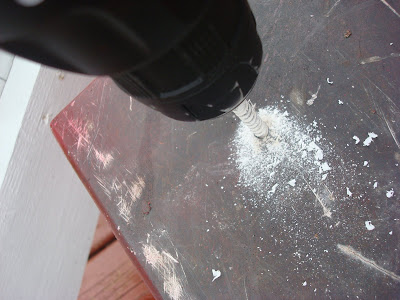
Just put a few holes in the bottom -- for plastic containers, any drill bit should work. These planters are a weird fiberglass kind of material, so I used one made for cement. I put five holes in the bottom of each. As is mentioned, even if your planters have holes, you'll probably want to put a few more in. It never hurts to have a little more drainage. (I feel like I just said "holes" 15 times.)

Anyhoo, after that, instead of buying a ton of of expensive potting soil -- try this little trick. Keep the plastic planters from the plants you plant, (wait, huh?), and before you put the soil in, put the old plastic planters in first:

This is great for two reasons -- you'll use half the soil, at least. And they are soooo much lighter to work with when you're done. My grandma used to use charcoal on the bottom of her planters. I've also heard of using the foam packing peanuts. Those peanuts are expensive though -- so just use what you have!

AND, please don't buy the expensive potting soil they put out right up front at the nursery -- go to the back and use the cheaper bags -- they are harder to find but are about two bucks and change for a bag. You can sprinkle some Miracle Grow on the plants after if you want that in the soil. I've even used the cheaper top soil and mixed that in as well, and those are only a little more than a dollar a bag.

If your plant is a hanging basket, take the little clips off the planter first:
Then, to loosen the plant up to get it out, roll it around on it's side a few times, then shake it a bit and it should come out easily:

The great thing about this time of year is finding plants for el cheapo -- they are clearancing them out for the fall plants and you can find major deals. I found some Coleus plants at Menard's last for only $3.99 each -- SCORE!!

I have never planted Coleus before -- I wasn't sure about them at first. I walked right by and left them there, but they were are oddly beautiful to me. Kind of wild looking but I was a bit mesmerized -- I had to go back for them:
Gorg!! Hopefully they'll hang in there for a few more months!

Remember, fall is a great time to plant bushes and trees! I have no idea why it's a great time to plant bushes and trees! But it is!! Really, I think it's something about roots, before the cold hits, yadda yadda yadda. So keep in mind even as fall nears (YAY!!!!!!!), you can still work on the landscaping for a couple more months!

So glad you all loved my hole patchin' post. Please check out the comments for some really great tips -- you are all so brilliant! Sorry I have no clue what to do with plaster though -- anyone know how to patch that up?

My consult rates will be $20 starting Monday, so if you are interested, let me know before then! I'm thrilled to be working with so many of you -- thanks for your patience. Any new consults may be about two weeks out before I can get to you, but I will as soon as possible!

Picture a Tray

The only negative thing about making a door into a table is that the uneven surface makes it difficult to display things. I could have topped it with glass, but seriously, who wants to have that additional cost, let alone clean a glass surface constantly.
My solution for creating an even surface is to
use a tray.
Oh how I love trays!
I'm pretty sure I have at least a couple of dozen of them, silver ones, wooden ones, store bought and handmade. But I thought I'd make one more.
I took out a wooden picture frame
from my stash.
Then had hubby cut and glue a piece of
scrap beadboard to fit the opening
(he enjoys taking part in my projects). I gave it a pretty coat of spray paint. And then gave it a good distressing.
My technique for distressing is pretty simple. I start by using my palm sander and scuffing up the areas that would naturally show wear, the edges, corners and under the handles. If I had used brush-on paint, I might have rubbed those areas with wax before painting so that the paint would wipe off easily to show the original layer. To add more character, I use a paint scraper. With both the sander and the scraper I make sure to vary the scuffs, heavy in some spots and lighter, or not at all, in others. If the scuffs are too uniform it doesn't look natural.
I then finish with a coat of stain or diluted brown paint.
I like working with water-based stains and paints because I can spray on a little water and wipe off as much stain as I desire. I try to leave stain in the corners and low areas that would naturally attract dirt and grime over years.Once dry, I added two old drawer handles. I could have added knobs, wooden balls or finials to the bottom for feet like I did on this tray, but I need my picture frame tray to have as much bottom surface area as possible. My new tray is beautiful and serves as a nice flat area on my door table to set my burlap lamp and other pretties.

The Transformation Of The Auction Chairs


After winning this pair of slipper chairs at an auction I started to question my purchase. Had I just bought the ugliest chairs possible?


Keeping the faith, I drew up a design for their transformation. Then I got to work refinishing the frames, selecting a fabric, Fabricut's Renaissance velvet in Spearmint, and delivered them to Kepler's to be reupholstered.


One day I stopped by Kepler's to check on the progress. What is that burnt orange fabric doing on my chairs?! Luckily there were no other surprises.


Driving to pick them up at Kepler's yesterday, I almost felt sick to my stomach. What if I didn't like them? What if there were problems with the workmanship? So it was a relief when I saw them in the shop window, looking fresh and beautiful.


The first is sitting pretty in the Family Room, filling a spot that had been waiting for just the right chair. The shot of color is exactly what this room needed to complete it, bringing out bits of the same color seen here and there in the built-ins. The chair is admittedly feminine and a graphic pillow brings it down a step. This pillow is an old favorite find from Pottery Barn, not quite the right size, but will do until I find or make a lumbar sized pillow.


The second is in the Girl's Dream Bedroom, looking absolutely adorable. Each chair has taken on a slightly different feel, adapting to its surroundings. If history repeats itself...furniture tends to travel around in our home...at some point the pair will find themselves in the same room side by side.

Wednesday, July 29, 2009

Look What I Saw In The Shop Window


I just returned from picking up the slipper chairs...I adore them! Here is a sneak preview, sitting on display in Kepler's window.

Walking into the store I overhear a woman inquiring if they were for sale. That certainly made me smile. Friends would probably be amazed I didn't sell them on the spot...items tend to revolve in and out of my home on a fairly regular basis. But the chairs have to at least get into the house before I can think about parting with them!

No time to take photos now...but will post more tomorrow, showing the chairs in the family room and bedroom.

Comfort and Joy

There is something about a throw draped over a piece of furniture that makes the room feel that much more inviting and comfortable. I wanted to achieve that same feeling on my porches, after all they're like a room---without as many walls.I went on a search to find something that would look both pretty and appropriate. With temperatures in the 90's and 100's it would look a bit odd to have a heavy throw resting on outdoor furniture.
While looking through a linen rack at my local thrift store I discovered a bunch of beautifully hand painted sarongs. These would make the perfect throws for my porches! They're large, lightweight and infused with color.
Now the furniture on my porches beckon one to sit in comfort, to rest for a few minutes and take in the joy and beauty of nature.