As many of you had commented on the paper lace that I used in my Black Pearl Tilda Card in my previous posting, I thought I would do a short tutorial on Paper Laces. As I mentioned though, when you see these paper laces, really, anybody can figure out how to do them, but maybe you just never thought of making them and incorporating them into your cards or projects. As they’re very easy to do, this is more of a display of the various ones that you can make. They are done with your border punches, strips of paper and by doing the punches on both sides of the paper length. You get different results by positioning your punch differently at the opposing sides.
If you don't already have the daisy/flower punch that I used before--I really didn't mean for you to go out and buy it right away (unless you really really love that pattern...LOL)--you can probably used an existing border punch that you have in your collection.
But I hereby confess...hee hee, I am a punch addict too!!!
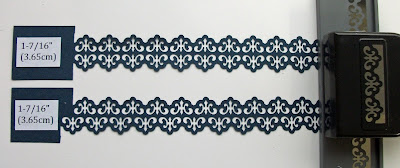
Okay, here goes..... (I've written down the width of the paper that I used at the left side.)
These are from Martha Stewart punches:


These are from EK Success punches:


These last ones are my favorite, I think. They look so elegant, don't they?
I have a few Fiskars border punches too, but you get the idea! Any border/edge punch will do the trick. You just have to vary the width of your paper strip depending on your punch. Experiment with different widths until the resulting lace is pleasing to your eyes. These are just some samples. You can create your own.
I have a few Fiskars border punches too, but you get the idea! Any border/edge punch will do the trick. You just have to vary the width of your paper strip depending on your punch. Experiment with different widths until the resulting lace is pleasing to your eyes. These are just some samples. You can create your own.
Use them on your cards if you don't have real lace. Sometime a plain ribbon is what's required, but if you need to add a little pizzaz to your cards, this might do the trick.
That’s it! Have fun!!!
Enjoy the rest of your day.


No comments:
Post a Comment