

Funky Junk Interiors and Mustard Seed Creations!
This week, Miss Mustard Seed is going to be talking about furniture stripping. I'm such a cheater and always tend to use shortcuts so I look forward to hearing how a pro handles the task.
This week on Funky Junk, we're diving into pretty pictures. :)

~ Blog Photography 101 ~
Great shots from a point and shoot
Are you ever annoyed with dark interior pictures? How about unfocused or crooked? Even with all those elements in check, ever wonder why your pictures just 'don't 'have it?'
I've long wanted to talk about this topic. As a weekend link party host, I visit ALOT of blogs with fantastic projects. As much as I enjoy visiting, there are times that I know some projects can be enhanced even more than shown, by a few VERY SIMPLE photography tricks.
I realize we're all running blogs, not submitting photos to high end magazines and contests and such. However, I'm sure you also realize, you yourself are more prone to be drawn towards a post or project that has well lit, clear photos. So why not have that be you too?
Why do you think your photos aren't the best?
Excuse #1: I have a cheap camera

What's that? You only have a little goofy point and shoot so you can't possibly have good photos? Did you notice what I called this seminar? :)
I'm here to tell you, you do NOT need the fanciest camera out there. I use this simple Canon A650 at about $300 from Costco. Probably down to $50 now. :) While I'd love a higher end variety one day, I'm getting all I can out of this little guy. I've also seen many poor photos out there with those using GOOD cameras, so don't let the type of camera you have dictate your end result.
True, there are really crappy cameras out there. However if your camera has a few settings on it to play with, I guarantee, learn a few of those settings and follow these steps and you'll improve your photos 1000%.
Excuse #2: I'm not a professional photographer
Please know, I am no pro but I do have an eye for what I like to see. I view taking a picture to buying a picture. Would I buy a picture that looks like what I see through the lens? If the answer is no, I move around until I see the picture as something I'd desire to keep. I'll teach you these tricks as well.
And I do my homework. Online searches for info, asking friends for advice and practice practice practice until I solve a problem. If pictures are fuzzy, poorly lit, crooked or out of focus, there's a reason and it's nearly always fixable.
If you'd like to improve your blog photos, this mini 5 part seminar is for you!


~ 5 steps to great pictures ~
1. Keeping your camera ROCK STEADY.
2. Proper lighting.
We'll go over some handy tips on how you can get some extra light into those dark interiors.
3. How to shoot with good angles and backgrounds.
You can greatly enhance ANY photo with a few easy tricks.
4. Using photo enhancing software.
I would never publish a picture that wasn't touched up in Picasa first. You'll soon see why.
5. Getting to know the settings on your camera.
Options are there to utilize. So find your manual and try a few.
Assignments
Yup! After each session, I'm going to give you an small easy assignment so you can test the new theory for yourself. The following week I'll be asking you how it worked out so I hope you'll be ready. :) If you'd like to actively take part and desire to post about your findings on your blog, feel free to add the workshop button in your post so others can climb on board and see where you're learning your wealth of new info from. xo :)
It's so hard not to dive into each of these topics in full right from the get go! IMO they are ALL very important and one can't be without the other. So let's just touch on one this week, and if there's continued interest in the topic, I'll run another tip for next week.
~ 1. Keeping your camera rock steady. ~
Rule: Your camera must NOT MOVE
Why not?
Your shutter takes it's dear sweet time when taking a picture. The dimmer the room, the longer the shutter stays open, bringing in more light to your camera.
While it's true your shutter works much quicker when outdoors, movement matters a great deal when indoors. There just isn't enough natural light, so the shutter is delayed, which is a big problem where movement is concerned. You move, you blur your shot. Taking a breath at the wrong time is all it takes to ruin a picture.
This rings especially true when using a point and shoot. The fancier cameras have lenses that help you deal with camera shake. But we do not. So let's read on!
This rings especially true when using a point and shoot. The fancier cameras have lenses that help you deal with camera shake. But we do not. So let's read on!
How to keep your camera steady
1. Use a tripod if you have it.

Pull the tripod out of the closet and start using it. I move around so quickly with shots, I don't even screw the camera onto the platform. I simply sit the camera on top, using it as a base, exhale, hold my breath, then click. With. Every. Shot. I. Take.
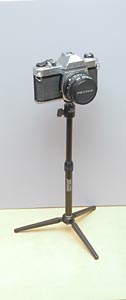
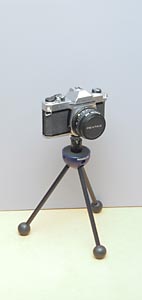

Did you know you can also get tabletop tripods? I WANT one!
2. Use any still object to stabilize your camera.


No tripod? No problem! For both these shots,the camera sat right on the table for complete stability, providing a unique photo opportunity as well. Simply tilt your camera upwards and you have yourself a new take on your topic.
For tabletop shots where you desire abit more camera height, set your camera on top of a cup or yogurt container. If you need a standing up photo, park your camera on a box on top of the kitchen table, the arm of the sofa, or the back of a chair. Anything stable will work!
No stuff to prop on?

Here's a 10 second video on a few hand tips - excellent!
3. Body tricks to keep your camera still
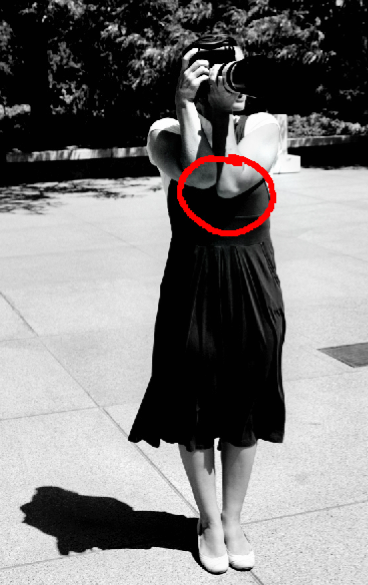
Elbows in, hold your breath.
by
Digital Photography School.com
Assignment
For the rest of the week, try propping your camera on anything and everything while clicking. Remember to set it down, exhale, hold your breath, and click. Next Wednesday, I'll be asking you for your feedback on if you noticed a difference. Feel free to create a post on a before and after that you can display the url within the comments if you wish. :)
Me ~ "So Miss Mustard Seed, you're a pretty avid photographer yourself. Any tips on this given topic you can share?"
MMS ~ "“Donna, the information you are sharing is like gold. I have always had an interest in photography and it increased when I took an SLR photography class a few years ago. I learned how the film speed, shutter speed, and aperture related to one another to get the shot I wanted.
Anyway, I learned very early in that class that using a tripod or holding your camera steady is imperative to clear shots. I personally am too impatient most days to get my tripod out, so I tuck my elbows in tight, lean against a wall and hold my breath. Ha! When I write it out it sounds like a Pilates move. Most of the time that does the trick. I also use a Speedlight flash with a diffuser to brighten up my pictures on gray days.
I have a few tips if you currently have a point-and-shoot and you want to purchase a digital SLR.
First of all, research and pick the brand you want. Brand is important, so your equipment can grow as you grow as a photographer. I purchased a film SLR several years ago and went with Nikon. Every Nikon lens ever made has the same connector, so they will be compatible with any other Nikon camera. I purchased two lenses and a Speedlight flash with my film Nikon SLR and when I wanted to upgrade to a digital SLR, I only had to buy the body. If I ever want to upgrade my camera, I just have to buy another body and my old lenses will still work.
The second tip is to buy from a credible store. There are LOTS of scammers selling cameras on the internet. Watch out for “gray market” and US Made, instead of USA Made. You want a camera that has a USA warranty or you’ll be in a pickle if you ever need to get it repaired. Just do your homework and buy smart.
Third, you don’t need the biggest and best. The lowest end digital SLR will have all of the features an amateur photographer needs. I also purchased a Nikon certified refurbished camera body and that saved me over $100. It looked like it was brand new when I got it and it is still covered by a warranty.
And lastly, buy an extra battery. I go through my battery in about a week and it is wonderful to be able to change it out and keep on snapping. It was a great buy.”
So what do you think?
Does this series interest you enough to continue? Is there something else you'd like me to attempt to cover that isn't listed? Desire a mix up of topics or hack at this one until done?

Make Mine Beautiful's workaprons are on sale!
Click HERE to check it out.
Next Wednesday is the Work Apron Giveaway Event!
Don't miss it!
No comments:
Post a Comment