

Funky Junk Interiors and Mustard Seed Creations!
This week, Miss Mustard Seed is having a guest post on organizing! Perfect topic for this time of year.
This week on Funky Junk, we're continuing with Part 2 of

~ Blog Photography 101 ~
Great shots from a point and shoot

Disclaimer: I am not a pro photographer. I've never even taken a course. The info I'm providing you is simply from my own personal experience, as well as tips from friends and online resources. If you can add/suggest additional related info, I very much welcome your input in the comments. Thank-you!
2. Proper lighting. - today's lesson.
To come:
3. Using photo enhancing software.
4. Shooting with good backgrounds and interesting angles.
5. Getting to know the settings on your camera.
~ Part 2 - Lighting ~
It goes without saying, one of the most difficult things to overcome with blog photography are indoor shots. And since we're always photographing our projects inside our homes, we're faced with this issue with every click.
We, as blogging decorators, don't own all the fancy gear high end photographers use, so what does a person do with a simple point and shoot? Can we achieve good indoor results with a simple camera? The answer is YES. And here's how I do it.
~ 1. Turn off the flash. ~
Flashes are your worst enemy and cause alot of issues with your pictures. A direct flash over exposes your subject, washing away all that precious colour, AND creates nasty dark shadow lines behind your subject.
Another reason flashes don't work for rooms in particular is, the light is too far away from your subject. When you take a photo, the light only travels 1/4 of the distance that you're standing from your subject. You need the light ON your subject. Makes you wonder why cameras even have flashes! (I think it's for emergency situations myself)
Do you remember seeing old photos where the photographer would hold the flash away from the camera? With the flash further away from the lens and closer to your subject, it's possible to bounce the light off a ceiling or wall, giving you a much more softer light. This is called diffusing the light which we'll get into in a moment.
Higher end cameras carry flashes that help you to utilize light diffusing tricks. However point and shoots don't. So, we need to create our own additional proper diffused lighting. Incidently, pro photographers use additional lighting too. :)

Both pictures were taken on Automatic. No attempt was made to create a bad before pic. I simply freeheld the camera as still as possible, and shot the picture with the flash on and this was the result. Nasty!
Problems:
picture blurred from camera movement, dark shadows, over exposed colour tones.
Changes made to pic on right:
tripod, no flash, extra light source in the room
Result:
dark shadows disappeared, colours were maintained
Although I don't regard the photo on the right as one of high quality, it's much improved in mere seconds by those simple tweaks anyone can master immediately. How to flip a standard photo into a quality one is forthcoming in another Workshop installment.
~ 2. Add light. ~
a) Move it to the light.
Utilize natural lighting whenever possible. Positioning your subject near a window or open door is a great idea, as long as you shoot facing away from the window. If you shoot towards a sunlit window, you'll capture a silhouette of your object. Always shoot away from the light source, but make sure your subject is getting the light in 'it's face,' not the back of 'it's head.'

Outdoor diffused photos are the best!
Outside light is even better, as long as the light is diffused. For many of my own shots such as the button one above , I use my outdoor patio, which has a white plastic corrugated roof. This allows the light to penetrate through, diffusing it beautifully. I never add additional lighting when shooting in this location.
b) Bring in additional light

When you can't move your subject outdoors, you're forced to deal with an interior shot. Meet my two best photography buds, Tripod and Lamp Tree. Good thing they're skinny because they generally live in the middle of my livingroom.
Don't have a lamp tree? They are cheap to purchase. What I like about it is the dual lights I can bounce off each other. When I get a better camera one day, I may go more pro, but this is working today. I'll tell you how I use it below.
Nerd tip: Did you know lighting inside a home generally casts a yellow glow on your photos, while a flash on a camera won't? Experiment with the compact fluorescent bulbs as well as others. You'll get different results!
c) Diffusing the light
In order to produce a soft light which produces soft shadows, you need to 'spread the light out' with a diffuser. A diffuser actually increases your light by widening or spreading the beam.

Here's a setup of how a pro would take an interior shot. This light is diffused with a translucent umbrella. Other tricks are used to spread the light too. Videos links are below.

One way I diffuse light - blurry pic due to NO tripod. :)
Here is my method of diffusing the light. An oriental screen from a thrift is used with the lamp tree. This setup was used to capture pictures of my Christmas tree. Do you remember even ONE shot of someone's tree in a well lit room?

Result of diffused lighting - photo has been software tweaked
This was my shot. No dark room. No yellowish overtone. No washing out of colours. From my little point and shoot.
However, 99% of the time I diffuse the lamp tree light in a different way:
- move it abit further away from the subject
- cast one light on the ceiling
- cast one light on the floor
This method has the light bouncing off the floor and ceiling, then back onto your subject. You can increase the light bounce even more. That part will be explained abit more further down.
Important! Ensure your subject is NOT being hit directly with the beam of light. This will cause all the same issues a flash will.

Here's another way I diffuse light. I simply remove a lampshade and utilizing that very lamp, move the shade around to cast the right amount of light on my subject.
If you click the title link above, it will take you to a wonderful site that has very short but excellent teaching videos on how to diffuse light with simply made things. Watch #2 and #4. You will better see what diffusing is all about and realize you don't need alot of high end equipment to get great results.

Point of interest - on one of my junkin' days, I came across a filming of a movie on this great building. I found it interesting how they diffused the light. They used this method even during daylight, so it just goes to show how important additional light sources are.
~ 3. Use that tripod ~
Indoor pictures slow down the shutter speed, and ANY movement, even breathing or clicking your camera, can cause your camera to move, resulting in a blurry picture.
Stabilize your camera for indoors, without fail. And as Songbird suggested in comments in Part 1, you can also use the auto timer in your camera to actually do the click so your camera is 100% shake free. Brilliant suggestion for a fussy indoor shot!
Something is still missing. BIG time!
Your camera light settings as well as a photo editing software will also highly dictate the end result of your interior pictures. I am addicted to these two steps. So don't get too discouraged if your pics are still in the ehhhh realm. You really need all of this stuff to make your photos sing.
Recap:
To get the very best indoor pictures possible:
1. Turn off the flash.
2. Stabilize your camera so it's 100% shake free.
3. Push back curtains, flick on all lights, open doors.
4. Bring your subject closer to the natural light if possible.
4. Use another source of light and diffuse the light beam in some way, never hitting your subject with the direct beam.
Me ~ "Miss Mustard Seed, what valuable tips can you share on the lighting topic, from your own experience and photography course you've taken?"
MMS ~ “Donna, I love your creativity with diffusing the light. That screen idea was brilliant!
I am fortunate to have a really nice camera and a speedlight flash to go with it. I can point the flash straight up and “bounce” the light off the ceiling. It floods the space with a soft white light and allows me to shoot in rooms with low light or on gray days.
If you don’t have a diffuse for your flash, you can use a piece of white printer paper. Just hold it in front of your flash or loosely tape it on and it will diffuse the light nicely. I’ve never tried that on a point-and-shoot flash, but it works great on my speedlight.
I am going to purchase a diffuser for my flash in a few weeks and I am considering investing in some lighting as well. All of that is certainly not necessary for the average blog photographer, though. In addition to my blog, I have an Etsy store, website and marketing materials that I use my photography for, so quality pictures are a must for my business. “
Assignment for this week
Seek out an additional light source and light up those interiors! Using your tripod, pick a subject and experiment. Y ou will be pleasantly surprised with the results. :)
Assignment #1 from last week: reducing camera shake
How did you do?
Did you see a result with your camera perfectly still?
Any comments/questions on this week's installment?
If you have any samples of last week's assignment, feel free to add the url to your comment so we can check it out. :)


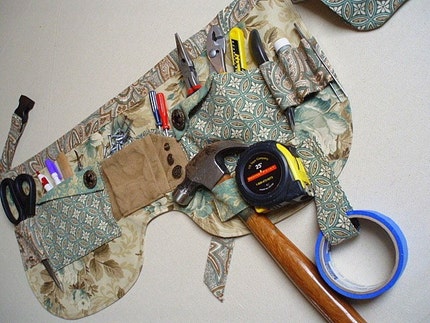
Quality work aprons by Make Mine Beautiful
The work apron giveaway event
has been moved to this weekend's SNS with an added surprise you don't want to miss. :) Hope to see you there!
Click HERE to check out the amazing selection and new stock!
No comments:
Post a Comment