I just had a conversation with someone new to my junk world yesterday. He asked what I did.
"I... uh.... decorate with... junk."
"???"
"Here's the blog url. What I do sorda defies description..." (LOL)
Naturally I didn't have any cards on me! When will I treat this like a biz anyway? :)
When you go out and about, it's my bet you talk about your blog (or fill in your given passion HERE) at some point. Do you have a card to back up that information that you really exist?
Go pro! And get some cards! Here's how I did my own. (for the time being)
Technical babble on drawing graphics
Many ask me how I create blog buttons or my own graphics. It's all done in vector format to start, then I export them into jpg's to the sizes I desire depending on what I need. To read up on what vector is, see below. To ignore the lesson, scroll below until you reach the picture.
Creating graphics... in vector format.
I use a vector drawing program called CorelDraw for my graphics biz. I have plans on getting Illustrator when funds allow, however they both do the same thing. They allow you to create vector drawings.
What's vector?
Vector is a term used to describe how something is drawn. A vector image is a drawing with lines attributed to your images much like a non coloured colouring book page. You can then export your vector drawings into jpg, png, etc.
Vector = drawing. Jpg = picture. Different things for different reasons.
Vector = drawing. Jpg = picture. Different things for different reasons.
Why use vector format?
There are no pixels or dpi to worry about with vector. Did you know most non photograph jpg's start as a vector drawing? Images you create starting in vector format are the sharpest and cleanest, giving you wide open options on how you wish to export/save them for other uses.
There are other programs that will allow you to draw vector, and most likely many free ones too. Simply google FREE VECTOR DRAWING PROGRAM (for windows or mac) and you'll get 101 listings. Pick one, download it and play around! Corel has a steep learning curve and retails for approx $400ish.
Many are using Picnik to create blog buttons so it's worth checking into. Doubt if they're vector though.
My blog header consists of the logo done in vector format, overtop a photograph I've done enhancements to. In quality vector programs, you can combine the two which is pretty cool.
So what did I create?
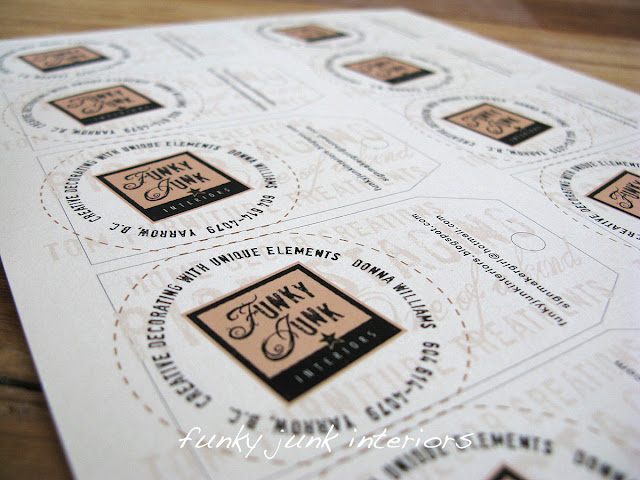
2 in one biz card tags!
I designed my card on a tag so it could serve the purpose of both a price tag and biz card.
I simply layered vector image upon vector image, then printed them out. The text in a circle formation is part of the learning curve of a vector program. You just need time to learn the techniques. I have 20 years experience so for me it comes easy.
Print them yourself or go pro?
Being that I don't require a zillion in quantity from the getgo, I decided to do them in this old fashioned hand done variation of print, hand cut and punch. When and if I know what I desire for future needs, I'll get them pro printed.
What type of card stock?
The card tags are printed on heavier card stock at the basic print quality level. You can move higher up in quality using photo paper if you wish too. However, I was after a slightly grainy look so I didn't mind the standard print quality this round.
And there you be! My biz card price tags. :)
I really like the little twine ties attached. It's unexpected and I think they add an extra element not generally associated with a typical biz card that will help make others remember you. And that's a good thing. :)
Do you have an actual blog biz card to hand out?
What program are you using to draw/create your designs in?
inspired by
inspired by


No comments:
Post a Comment