Showing posts with label decorating dilemmas. Show all posts

Monday, October 10, 2011

Toy Storage in My Boys' Room~

After my post on the Boys' Room Reveal, I had a few of my readers asking about toy storage.  Isn't storing toys ALWAYS a dilemma? 

Luckily, we have a small loft where we keep the majority of the toys for the younger boys (as well as the Wii, and other kid-friendly entertainment that I'd rather not have in the main living space).  That said, we do have some toy storage in the boys' room.

Boy #1 is a bit of a Lego fanatic.  Okay, that might be an understatement.  He is completely Lego-crazy.  Combine that with a love of Harry Potter and Star Wars, and isn't hard to guess that we are overrun with Lego sets.  So, in the room design I added a couple of shelves for displaying his favorite-at-the-moment Lego creations. 


And, in all honesty, the top of this green dresser occasionally gets used as display space as well (although not in this pic - ha).
 

As does the top of the bookshelf.

And there is even more space out in the garage "man cave" where the Hubby helped Boy #1 construct a makeshift Lego table.  That's where you'll currently find Lego Hogwarts, as well as a Quidditch match.


Of course, if you have Legos at your house, I'm sure you know that the sets don't always stay put together, and those little bricks find their way ALL OVER YOUR HOUSE (and under your feet - OUCH!).  But we've found that inexpensive buckets from IKEA do a great job corralling them.


And for the littler guys who still play with other building toys, these closet bins from Tar-jay do a great job. 


And they all fit nicely in the Expedit bookcase from IKEA.  Love that thing.

So, there you have it.  A bit (just a bit) of toy storage solution for you....that is if you have Lego-hoarders like I do. ;-)

Have a great day~

Thursday, August 18, 2011

Entry Way Dilemma~

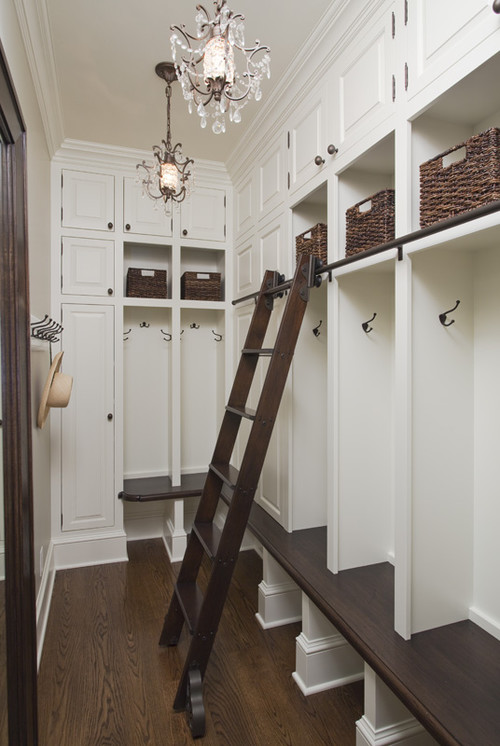
The layout of the entryway in our new home is such that it actually connects the front door and the entry from the garage.  Because of that, I want to create a space that functions like a mudroom, but I want it to be quite attractive because it is the first thing that someone sees when entering the house.

I love this entry from Pottery Barn.  I love the gallery wall, the eclectic feel and the fact that it has a little bit of a rustic edge to it.  Functionally, it could really use some hooks for jackets (where would those go?) and somewhere for shoes, but the baskets would make great storage for the kiddos school papers etc.


Then there is this lovely mudroom that I found on Houzz.com.  Although I'm in love with the ladder, it would be an accident waiting to happen in my house with 4 kiddos (especially with my 2 little boys..oy!) and because we are renting this house, we couldn't do a built-in per se, but the hubby can easily recreate a similar look that we would be able to take with us when we  move.
Mud Room traditional laundry room
traditional laundry room design by minneapolis architect Charlie Simmons - Charlie & Co. Design

My feeling is that even though I love the eclectic-ness of the PB space, the functionality and clean lines of the other mudroom would probably work better in my house

What's your opinion?  Eclectic?  Traditional?  I'm interested to know.

Frugal Friday goes live tonight at 8 MST.

Monday, June 27, 2011

Stuff (and the Pick Your Plum Winner)~

Happy Monday folks!

This is it...the week of the big move.  We move on Saturday and we're down to the last bit of packing.  I was a good girl all weekend and got the bulk of everything finished...although I still have some of the kitchen and the last minute stuff to do.  I don't know about you, but moving has to be one of my least favorite things on the planet.  Ah well, I keep reminding myself that a new place to live means new rooms to decorate (and new projects to blog!)

I may be a bit scarce this week as I try to get all the last minute stuff done (not to mention the fact that my sweet in-laws and dear sister are both coming in town this week as well).  But never fear!  Frugal Friday will be up this week as usual!

In the meantime, I have still been pondering the dilemma of three boys in one room...I have decided that we will definitely be using the bunkbed with a trundle.  And I think we've decided to go custom.  To either have it built or build it ourselves.  The hubby could totally tackle this project, but time constraints might lead us to having it done for us.  So I've been gathering more bunkbed inspiration...here's my latest favorite via Coastal Living.


I love the idea of a nautical feel without being in-your-face, and I think this room does a FABULOUS job of that.  Lovin' the houndstooth bedding as well.  That's a look I've been wanting in the boys' room for.ev.ah.  Also, I've really wanted to go with white beds, but I didn't want the room to feel "girly".  I think this room feels totally "boy" while still using white!  Love that!

Finally, the winner of the Pick Your Plum winner is Sandee Spencer!  Congrats Sandee...drop me an email and we'll get you set up with your prize!

Have a great day~

Wednesday, June 22, 2011

Dilemma~

The house we currently live in has a formal living room and a family room.   The TV, wii, and all other sorts of kid-entertainment are in the family room.  Since the kids spend most of their time in the family room, we've had a pretty white slipcover on the sofa in the formal living room. 


The house we owned in Massachusetts had one main living area where the kids spent most of their time.   I learned quickly that I didn't like having to launder white slipcovers constantly, so we used a tan slipcover in our Massachusetts house.    

The house we're moving into also has one main living area.  So it begs a question.  Do I stick with my pretty white slipcover and launder it constantly?  or do I use a slipcover with color?  I have been smitten with this gray velvet slipcover that Comfort Works created for an Ikea Ektorp Sofa like the one I have.  It's been making me think that I could totally go with grays in my living room. 

Pretty Petals via ComfortWorks website

Pretty, isn't it?  Ikea also makes a gray slipcover although it is more of a charcoal and is made of linen. 

So I ask your opinion, my dear readers...white or gray?  What do you think?

Sunday, June 5, 2011

Girl's Bedroom Inspiration~

Whenever I have a new space to decorate, I obsess over it.  And when I say obsess, I reallllllly mean it.  So you can just imagine how my thoughts are spinning in circles at the prospect of decorating a new house.  It's exciting and anxiety inducing all at the same time.  My problem really lies in the fact that I like so many different styles of decor that narrowing my options down can be quite a challenge. 

Right now, I am thinking about my daughter's bedroom.  And my biggest challenge is the color scheme.  This is what her current bedroom looked like when I first decorated it. 


And then, because I'm an obsessive tweaker, this is what the bed looks like right now.  I like the addition of the brown because I think it keeps the color scheme grounded, and makes it a bit more sophisticated.

I do really like it. But you see, I had to work around the existing citrus green walls.  They aren't my favorite color.  And since we currently live in a rental house, I wasn't allowed to repaint them.  They gave me a starting point for a color scheme, however, and I'm happy with what I came up with.

But since we will be allowed to paint in our new rental home, my options are endless.  Too. Many. Choices.  Recently though, I have been drawn to these rooms by Restoration Hardware Baby & Child.  At the heart of it, I just really love neutrals..and these rooms do neutrals so beautifully (with just a hint of soft color) that I am absolute smitten.


What do you think?  Do you like lots of color for a child's room...or could you go with neutrals?  Oh, the possiblities!

EDITED TO ADD:  My dear readers, I think I gave the wrong impression with this post.  I realize that decorating my children's rooms is not about my favorite things.  That's why once my children are old enough to truly give me their input, I involve them wholeheartedly in the design process.   The princess and I have been having numerous discussions about her ideal room and her favorite colors, and ultimately, her choices will be my starting point.  But I do obsess over the rooms in my house, and the kids rooms are no exception.  That's why we work together.  It's more fun that way too!   THANKS!

Wednesday, April 27, 2011

Creating a Gallery Wall~

There is a wall in this house that has been driving me crazy since we first moved in. It is at the end of a long hallway. It is quite large. And it is BORING.


I decided to create a gallery wall there some time ago, but I was dragging my feet a bit. I wasn't sure exactly what type of gallery wall I wanted. So I gathered inspiration and finally decided that I wanted something fairly cohesive but a bit organic.


Here's how I turned this wall (which, by the way, might be the most boring photo ever posted on the internet)....


Into this gallery wall....

First of all, I had to make a decision about the frames. Did I want black frames? White frames? Mismatched frames?

I finally decided that I wanted white frames...and not just any white frames. I wanted matching white frames. And I couldn't spend a fortune. So I went to IKEA and found some in a couple of different sizes (some for 5x7s and some for 8x10s).

I am ashamed to say that after I got the frames home they sat...for quite a while. Because I had decided that I wanted the gallery wall to be a bit organic, but I wasn't sure how I wanted to accomplish that task.

Remember when I told you yesterday that I had the perfect place for my sweet Lisa Leonard pennant banner? Well, once it arrived in the mail, it gave me the perfect idea for how I wanted to finish my wall.

So I gathered up my photos and filled those frames. Then, I laid the frame out on my bed to get an idea of how I wanted them to look on the wall.


I've seen a lot of gallery wall tutorials with kraft paper and carefully measured placement. And those are wonderful. But I am not that girl. Impatience is my middle name...and I love to eyeball things. (When I'm doing things for myself that is.) So I started with the middle photo in the collage and moved out from there. Eyeballing measurements as I went.


And to add to the organic/ eclectic feel of the wall, I threw in a couple of monogram "H"s. This metal one is from Anthropologie...it used to sit on the white buffet in my living room.


The white "H" came from JoAnn's.


And then, the piece de resistance my pennant banner. Love. it.


Here's the finished wall again. I'm so happy with the way it turned out.


There's still time to enter the $75 Lisa Leonard giveaway...just scroll down to yesterday's post and leave a comment!


Have a great day~

Monday, March 14, 2011

Easy (and removable) Chalkboard Wall~

So as I've told you before, we are renting this house. And it's a great house. I have no complaints other than the fact that I can't paint the walls. (I even got up the nerve to ask the landlords when they agreed to let me paint the fireplace... no go. Fireplace - yes. Walls - no. Sigh.) Oh, and the fact that there are no doors on the closets. Closets are for hiding clutter...are ya with me on that one? But I digress. Back to painting walls.


I have been wanting a chalkboard wall in my office/mom cave ever since I saw Emily's office. Swoon! And I have been toying with ideas of different ways to have the look of an entire chalkboard wall without painting the wall itself. I didn't want it to be just a big chalkboard...I wanted it to be a wall.


I came up with some ideas that I thought were pretty good, but I was never convinced...until I saw this post at Craftberry Bush.

ADHESIVE VINYL CHALKBOARD BABY!!!

I looked all over trying to find the long rolls that she talks about in her post, and was finally able to locate them at Michael's Craft. So I bought 4 rolls...they're each approximately 20" across and 60" long. They don't reach from the ceiling to the floor, but since the desk was going to be sitting in front of them I figured there would be the illusion that they reached the floor.


I was literally able to put them up in about 10 minutes. And they stick GREAT! AND...the most important part for renters...they remove just as easily. I am seriously just about giddy. So much so, in fact, that I didn't even style the photos...I just took 'em to show you the wall.


So, just so we're all on the same page, I still need to accessorize the desk. But isn't that chalkboard fabulous??!!??


I'm going to say it again...ADHESIVE VINYL CHALKBOARD BABY!!


If you want a chalkboard wall...but don't want to paint...try it. You can thank me later. :-)

Have a great day~

Monday, February 14, 2011

Lighten Up~

I have been wanting to brighten up this drab little corner in our dining area for quite a while now. It just wasn't doin' it for me. So I drew up a little plan and went to work.

First up...change the lamp. The gold isn't part of my color scheme anymore. Ever since we switched the carpet in the living room (which is open to the dining area) I have eliminated the golds, reds and browns from the color scheme, and added more blues and whites.

But I like the lamp. I like the shade. I just didn't like the color. So what's a frugal girl to do? Why spray paint the lamp, of course!


I followed a tutorial from Janell over at Isabella and Max rooms. So rather than reiterating it here. I'll simply give you all the link.

I will however, share a few super-duper exciting photos of my lamp spraypainting adventures.


First, leave it to me to realize I was out of painter's tape AFTER I had been to the store for the spraypaint. So I improvised with a shopping bag and electrical tape. It worked just as well...luckily.


In her tutorial, Janell used Rustoleum spraypaint. I used Krylon. I like both brands, but I will say that the clear coat from Krylon was not as glossy as I had hoped. It has a nice sheen, but not a high-gloss. Just sayin'. (Of course, that could result from the fact that my main coat was in a flat finish...I already had the paint so I went ahead and used it...but perhaps a semi-gloss would have been better to achieve a glossier final product.)


Because this lamp is short and squatty, the only way to reach the bottom was to hang the lamp upside down to spray it. Worked like a charm.


And here she is all pretty and white. I'm lovin' her new softer, gentler personality.


Tomorrow...step two in the Lightening and Brightening process for this little corner.
Oh, and just a note that I took down my Formspring account. If you recently asked me a question on Formspring, and you didn't get the answer before I removed my account, feel free to email me. THANKS!


Have a great day~

Sunday, February 6, 2011

Making a Mudroom~

Not long after we moved into this house, I decided that I couldn't live with the boring coat-hook area just inside the back door. So I gift-wrapped it. Here is the area after my papering adventure.


It made the area much happier, and suprisingly, the gift-wrap held up really well. As a matter of fact, it was still in great shape, up until Saturday when I changed it out. As you can see in the above photo, there was a door leading into the kitchen that made the entire area really unusable. Because of that, my kiddos all used the front door as their main entrance. That really bothered me. I couldn't stand the mess of shoes and backpacks littered all over the living room. So one day a few weeks ago, I simply took the door off the hinges. Wow! What a difference that made!

And then I got the idea that I could turn the area into a little mudroom-of-sorts. So for those of you who guessed that I was using the bench in a mudroom....you were right! Luckily, the bench my papa made me fit just right in the space after I removed the door.


But I didn't like the aqua color of the bench with the green wrapping that I had used previously on the wall. So since I had to be home with the kiddos while the hubby was in the emergency room on Saturday, I switched out the paper to a black damask pattern instead, as a way to keep my mind busy while I waited to hear what was going on with John.


It matched well with the Ikea shelf we placed over the bench. (We found it in the as-is section for only $4.99...I think because the hooks were backwards..."so what!" says I.) I added two Ikea shower caddies to hold each of the kiddos gloves and hats...and a cute silver bucket that I found in the dollar spot at Target to hold miscellaneous whatevers.


Because the shelf was quite heavy, we had to mount it to studs which left it off center. So I filled the empty space with the vinyl silhouettes I shared last week. I then topped off the shelf with some Ikea magazine holders ($1.99 for 5) that hold papers..."to do", "bills", and "to file". The basket is from Christmas Tree Shop, and the boot tray under the bench is from Walmart.


On the side of the kitchen cabinets next to the bench, I placed an Ikea magnet board to hold invitations, photos and the kiddos weekly homework assignments. (You can see that we left the hinges attached to the doorway...this is a rental afterall, and I wanted to be able to put the door back on easily when the time comes.)


The spot is a little tight (hence the awkward photos), but it is very usable, and accomplished my desire of having the family use the side door as their main entrance. And it's cute too! So, overall, I'd say "mission accomplished"!
And the "keeping it real" shot for the day...what the coat hooks usually look like on a daily basis. That's life with 4 kiddos. ;-)


Have a great day~

Wednesday, December 15, 2010

Random Rug Ramblings~

We have a very pretty area rug in our living room. We bought it about 5 years ago and it was not cheap. I like it. But my love affair with it is waning. It is tan with reds, golds and browns. I have been fighting the desire for quite a while to add blues to my decor because they just won't go with the rug and I can't justify buying a new rug when we have a perfectly good - and not inexpensive one - already. (You can see one end of the rug in the photo below.)


Here's where the story gets interesting. Or gross. The Princess woke up in the middle of the night a couple of nights ago with a tummy ache. She couldn't sleep so I got her settled on the couch in the living room with a movie on the TV (we don't normally have a TV in the living room, but there is one there right now left over from the Hubby's convalescence.) Not long after I was settled back in bed, I got the frantic shout from the living room that she threw up - I realize this is probably more than you wanted to know but it is pivotal to my story. And it wasn't until I got in there that I discovered that my area rug was a casualty.

Now, I have scrubbed, and scrubbed. Lysoled. Febreezed. You name it, I've tried it. And the smell remains. (I realize the smell will fade over time, but humor me please.)

Every year we receive some Christmas money from our parents. (And by we, I mean each member of the family receives an alloted amount.) This year I had been toying with the idea of buying a new rug for the living room, but I couldn't justify it to myself, because being the decorating-obsessed girl that I am, it seemed like a guilty pleasure to me -especially since we have already established that the rug we have was perfectly good. But now that my rug smells completely atrocious, I feel justified in using my money to buy a new one. (Okay, it's a bit of a weak justification, but it works for me...and it is gift money after all.)


So after that uber-long explanation, here is the meat of my post. I really want to purchase a sisal-type rug. I am considering one from IKEA like the one pictured above because their prices are doable for my budget. But I was wondering, my dear readers, if you have any suggestions? I need a rug that is roughly 8x10. And I can't spend a lot, but I don't want it to look (or feel) cheap. I sure could use some input. Anyone out there have experience with the IKEA rugs? Anyone have any other suggestions? Sure hoping you can help a gal out.

And on a completely different note, just a reminder that Frugal Friday goes up tonight at 8:00 pm MST. Hope to see you all there!


Have a great day~

Tuesday, June 1, 2010

Stylish storage for kid clutter~

Now that the majority of my house is starting to look the way I'd like....I'm focusing my attention on the family room. I've had numerous comments from readers asking how I store my kids' toys. Trust me...it isn't pretty...YET.

Here's my theory on the subject. If you have kids, they have stuff. And usually lots of it. Instead of trying to decorate your home as though kids don't live there....embrace it! That doesn't mean that you have to put Winnie-the-pooh or Disney decals all over your walls. There are tons of storage and decor options that can appeal to you both.

With that in mind, today I wanted to share some pretty kid spaces to get the creative juices flowing..


Photos above from PB kids


Photos above via houzz.com


Have a great day~