Showing posts with label kitchen office. Show all posts

Sunday, August 29, 2010

The pallet desk project - Part 6, the BIG reveal!


~ The Pallet Desk Project ~

(all parts to date here)


Today
 Part 6 - the big reaveal


Did you see part 5? It was also posted today, so don't miss out on how I did all the things you're about to see here.

So are ya ready?!?

~ This is where I blog ~

I was thrilled when I read about Kate's "Where do you blog?" party. It was the perfect motivation to concentrate on getting this series to a close. And guess what. I did it! :) Thanks Kate!


My blog office is located in our dining room. I LOVE blogging in this room because it's central to everything else that transpires in the household. There is no need to hide away in an office or bedroom and miss out on what the others are doing. I'm right here.


What makes this office extra special though, are all the elements I've surrounded myself with. I love everything on that floor to ceiling storage system. Every object inspires me!


 But what makes this post really special today is the fact that this long awaited funky table is now complete!

I desired a bigger table than what I had, as well as the top secret feature this desk hides. The 27" monitor is sunken into the desktop! This enables me to have my eyes level with the top of the screen, no longer looking up, which was really hard on my neck. ( see part 4 above )


And the build couldn't have been easier, especially for a non builder such as myself. Two sawhorses are the legs...


... and the old palette boards for the top were simply screwed onto the ladder framework below. I made no effort to hide the fact that a ladder was used because I thought it added an additional whimsical detail.  AND a place for the meat grinder pencil holder to sit of course. :)


Old palette boards were sanded and attached in a slightly random style to encapsulate the feel of someone gathering different boards over time, saving them up to create something special.  All the wood was left in it's natural state. The top of the desk will receive a matte finish in due time so it's extra cleanable.


No two boards are alike which is what makes them extra special. The odd white one was even thrown in for good eclectic measure.


Plenty of random screws, big bolts and stenciling just add to the gathered over time scrap look I was after. I felt the boards resembled railway ties in a way, hence the chosen words used for the stencil.


What's not to love, when you surround yourself with all the things you love?


I especially love the desk for the fact that it isn't fussy. The more wear the boards will no doubt receive, the better they'll look over time. If you start with something old, you get the look far faster than if you start with brand new.


Just so I don't miss out on any action, the desk was designed so my son could sit with his laptop right beside me. He wants to start a Lego/photography blog, so stay tuned for that one! I'd like to entice that artistic ability he has any way I can. And what better way to encourage/monitor his doings than having him right beside me? :)


And for those that know me well, it comes as no surprise that I'd incorporate my rusty gears and cogs into the mix on my side. :)


And this little bit of numerical fun changes every 5 minutes. I'll eventually figure it out. :)


Another thing I LOVE about blogging here are the double french doors I generally have wide open in the back. I can glance over and see the entire back yard and mountain view at any given moment, feel the wind and hear the giggle of happy kids doing their thing.


Blogging is a wonderful hobby, but this location makes it all the more special. :)


 When I moved in:


It turned out exactly the way I imagined it. And if I wish to freshen up the top, nothing a coat of white paint, distressed wouldn't cure. :)

Since this is part of a series on telling it like it is, it's safe to say I somewhat hesitate to hit that PUBLISH POST button.  Gaaa...  here we go again. Whoever said breaking new ground was easy?!?

Holding breath, taking the dive head first...

*click*


Part 5 on how I added the details was just posted today as well. Click HERE to get there.
Related posts:

The wall unit build is HERE.

The wall unit staging reveal is HERE.

Tuesday, July 6, 2010

Gitter Done! ~ volume 2


Welcome to


"Gitter Done!" - volume 2!

I gave you permission HERE to walk away from the computer to get some overdue DIY or non DIY tasks done and over with so you could blog allll about it.

Today's the day to reveal all your hard work! I can't wait to see what you've got. :)

This round I chose to work on a loooooong overdue project.  Let me just say, I'm grateful for the long expanse of time we had on this one!


You've seen this apparatus everywhere. It's just pine wall type storage meant for the garage. I recently acquired this from my mom's place. I started priming it fully assembled the day after it got here, but then it sat in front of my house for... oh... around 2+ months. I'm surprised the neighbors didn't call the city on me.

 I kid you not about the city thing.  It even gathered friends over time. The watermark on the pic says it all. This was one reason I started the Gitter Done event. I needed to get this done!

Then I bought a new computer and the whole world changed. It was time to get on with the new plan!

 When I realized painting it fully assembled was a dumb idea if I ever wanted to move the shelves around...


I took it all apart and pretty much started over. Not fun. Very tedious in fact. I painted the top AND bottom of EVERY. SINGLE. PIECE.


I first sanded and primed all the wood with Kiltz latex bonding primer, then went over it with 2 coats of semi gloss exterior. I honestly never thought this part was going to end.  But I did it in 2 days. WITH it raining. I know. I'm amazing.


Paint Tip: stack'em up

If you have a hundred thousand posts such as these, stack them side to side with edges up, and paint the edges all at the same time. Then lay them down and paint the flat sides. When dry, do the other remaining sides the same way. Just saves alot of edge work time.


Next, I glazed all the pieces, with a barely there tone as I desired the shelves to still look white, but to also show abit of character.  Brush on, wipe off with an ever so slightly damp cloth.

Install Tip: use a drill

Next came the big build. Using your cordless drill with the right tip is the ONLY way to do this! I staggered the shelves on the bottom to accommodate a file shelf etc. And instead of the normal metal back supports the shelves came with, I used sanded old palette wood for some added character. Can you get a feel for what's going on yet?

 I then used the window frames to mount the unit against the wall. With only 2 screws, this unit is not going anywhere, plus it's very easy to simply unscrew, pull away from the wall and adjust shelf height if I desire. Predrilling your holes makes this job painless.


Next I worked on the old farm table I had. I'll show you my trials and tribulations in an upcoming post soon. Oy... glad it's over!

Updated links:

 
The wall unit staging reveal is HERE.
 
Final reveal with the NEWER pallet desk is HERE.


 Here's a post on how to build this kind of unit from the ground up. 

EASY!

Next Gitter Done Event is
~ Wed August 4th ~


Rules for the Gitter Done Challenge:

1.This is an exclusive linkup event. Please link up only if your project was inspired by GD.  
Please bring your general linkups to SNS (on every weekend) as we'd love to have you join in then!

2. In your post, please tell us how GD inspired you.  
This will help me determine which are GD linkups vs general DIY linkups not suitable for this event.  (which will be deleted.. sorry!)

3. Your linkup does not have to be DIY related, just something you've been stalling on. You'll thank me later. :)

4. Please include a before and after pic, so we can appreciate all you did!

5. Please link back to the event by text or button. (see BUTTONS section in header area if you desire)

6. Please keep the 'jest of your project' new to the net until your GD reveal. (teasers or shoot off posts are fine!) This will give us all a reason to wish to tune in to see what's brand new!

Linkups that follow all of the above guidelines will have the chance to be featured, so watch the sidebar during the event! The link feature will be active for one week, so keep linking and checking in. :)

Your thoughts.. did the time gap between the two events seem about right or abit too long?

I can't wait to see your stuff!


My NEW kitchen office... for Gitter Done.

FJI's Gitter Done! challenge

Nothing motivates a procrastinated project more than hosting an event about the subject I tell ya. Add in the incentive that a new computer was on it's way, and I was rarin' to get this area prettied up!


This project is all about the kitchen office.


You may vaguely remember the old office as very woodsy and eclectic. While I did like it, my needs just changed. I wanted something light and bright to spark up the space and hopefully make it more functional to accommodate my work and incoming equipment better.


Paint and haul in your typical pine garage storage apparatus, and you too can create your own...


... built in wall to wall floor to ceiling shelving mayhem that can store a ton of fun! Push a farm table in front and you have yourself a fun little office!


All kinds of cool elements were added to twist this out of the norm. I found these galvanized corbels at the thrift - 2/$3.00. Funky fun!


The meat grinder pen holder made a comeback. It's just too handy. And oh so weirdly me. :)


Every shelf opening was first anchored with something woodsy, then blitzed up with... other fluffy stuff. The white crock is my grandmother's which I got from my mom's. My Denise Original FJI bird fits right in. :)


Careful consideration was taken to place non light obstructing items in front of the windows. I love my sunshine. :)


I don't know what that wood box was, but it sure is perfect to hold cds and dvds!


Another corbel was added to house dangling electronic gadgetry at an arm's reach. The Gray crate stores my son's school paperwork that seems to seep in the house daily.


This is the reason I did not cheat with the painting. I knew I'd be looking UP at the unit, so I painted every single square inch of it. Two clip on lights illuminate the space really cool like in the evening when all the other lights are out.


 Especially at night after my lil' dude is in bed and I can blog the night away. Cool eh?


Speaking of blogging...


... this is the new computer I've been ranting about for way too long now. But hey.. I only waited 15 years for one. I was overdue for a good rant. :) This crazy awesome screen is the jumbo 27" iMac and I'm fanatically and utterly in love with every ever lovin' pixel of it! I'll do a post on my new computer experience very soon.

The table was stripped down to a bare wood top with the base repainted to better match the surroundings. It's currently on trial and if it passes, I'll crate it up some. :) I'll do a tip tute on how I stripped it down.


 Using the same table, the cozy and intimate before...


 ... to wide open spaces after.  If you desire a built in wall unit, this is a fast and price efficient way to achieve something similar. Shelves can be staggered to accommodate file cabinets or printers. Check out how the unit just missed the windows. Perfect. :)


Update: this was after the palette desk was added.

The wall unit was not originally intended to go here, but for now, it works until I come up with something cooler.

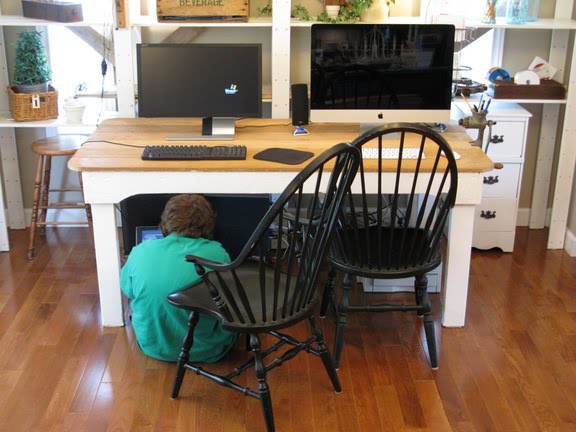
And you know us stagers... when we do photo shoots that matter, we have to teach our families to work around it, yes?


My son having to use his laptop under the table totally earned his slushie that day. :)

Wanna see the wall unit being tweaked? Visit the original Gitter Done Event post with the linkups HERE!

So... what do you think? What would you do to the table?

Related Post:

The build of the wall unit can be found HERE.