Hello my peeps!! I hope you had a LOVELY Thanksgiving week!
I’m so glad to be back, but the little blogging break was nice. :) I can’t wait to tell you what we were up to last week – but for now, I am SO psyched about the project that’s been going on around here over the past couple of weeks!
For as long as we’ve lived in this house, I’ve had a thorn in my side…that I may have mentioned one or 437 times.
Our family room set up was part of the issue for a very long time – but I addressed that earlier this year with our new sofa and moving the TV. LOVE it still – probably the best changes I’ve made to our home.
But there was that one thing. That corner thing. The one that drove me batty:

I curse the day I chose that corner fireplace! Shakes fists in air!!
I know it doesn’t look that evil. But it was.
Ahhh…all those years ago, I thought oh yes – let’s do a corner fireplace and be all cool and different and uh...ANNOYING.
I’ve addressed it numerous times – first by adding molding to the top. It started out looking like this:

And then I changed it up a bit later by adding a mirror over the mantel. It was great because it gave it the “feel” of a wall.
But there were still so many things that drove me nuts. I added crown to the room this year, and I had to end it by the molding over the fireplace. I hate the weird stop – but I’ve not found a better way to do it. And I realized a few months ago that part of the reason the fireplace looked weird to me was because it was so top heavy – big on top, little on bottom.
And the corner mantel was really a pain in my patoot to decorate. And I’m all about the decorate:

And even though the top was large and in charge, the whole thing felt too small for this space.
I thought about taking in the chunky molding on top, to make it less top heavy – but then I was going to have to redo that and the crown. Nah thanks.
Then I thought about building a wall above the mantel to close it off (many of you have suggested that). But it would have just made the mantel even smaller.
Then I had THE idea…and it was right in front of my face every night for the past eight years.
Why not try to make a full wall like the one in our bedroom:

Nah DUH.
I’m quick.
But then there was another issue – the firebox couldn’t be moved out to meet up with a new wall. I didn’t know how to make it work (I thought it all had to be flush.)
But then, one glorious day, I walked through a model home (one of my favorite things to do!), and found IT!!
It was a corner fireplace, with a wall. But the firebox was inset quite a bit:


It was a good five inches or so. And I knew I could do the same with our fireplace! (With some help.)
Cue the angels singing. (I almost wrote “angels signing” – which would be OK too.)
I called the handymen who did a ton of the work around here when we had the fridge/floor fiasco. I explained what I wanted to do, showed them pics, then showed them our upstairs fireplace and THEY SAID EASY PEASY SQUEEZY!!
Yesssssssssssssssssss.
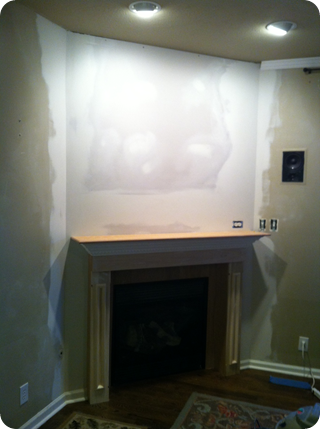
So a couple weeks ago we started with this:

Vince (Handyman #1) took the mantel off (it was way easier than I thought it would be) and the trim around the front of the fireplace, then started building a wall:

And what a glorious wall it was. I’ve never been so happy.
(They even added studs between the studs right where I would hang the mirror – no anchors needed!)
Then they drywalled and sanded like mad (which resulted in more dust than we had when the floors were sanded – no joke):
Then they started building the mantel. A REAL mantel people!
HAPPY HAPPY JOY JOY!
They couldn’t go real beefy with the surround because I wanted a DEEP mantel and enough space around the fire box to install tile. So in order to make that work, the sides were a bit thinner, but the molding and mantel were chunkaaaay.
To save on costs I finished the redo from there. You’d think it would be quick, but nah. You know me. :)
I found a beautiful mosaic tile at Lowe’s (I found it months ago and knew I’d use it if this project ever happened). The guys brought me their tile saw to use and it ROCKED! It was so easy to use!
I made the cuts for the side pieces:

And used mastic to apply them around the fireplace:

I just buttered the wall:


There was a bit of a gap between the firebox and the drywall around it when they pulled off the trim. You can see here that they ended up installing some luan that covers that gap and gave me a good surface for the tile.
Then I buttered the back of the tile:

And stuck it on. It does not take much – I used too much at times and it came out between the tiles. Not hard to clean up, and you just learn as you go. I didn’t have to grout because the tiles were so close – whew!
I LOVE how it turned out!

We went away on vacation last week, and I was chomping at the bit to get this finished up! I worked most of today painting. And painting…
Forgive me for these pics – it was pitch black at 5 p.m. and I was busting booty to get this finished today…but the pictures didn’t start till about 7. :)
After three coats on the wall, four coats on the mantel and surround (it still needs at least one more), reinstalling all of the wainscoting next to the fireplace and then some quarter round at the bottom, I was DONE:

What you don’t see here is the nice little large spot where I put painter’s tape on the wall too soon and had a nice loooong patch where the drywall was exposed. And then had to patch and paint all over again. Hence the 7 p.m. pics. ;)
But I’m pretty much done – finally! I put accessories up there for it’s first photo shoot and I was SO excited at how easy it was to make it look decent and how BIG the mantel is and HOW MUCH I LOVE IT!!!:

:)
The guys used one (really, really thick) piece of molding to beef up the mantel and I love it – its exactly what I was hoping for!:

I still have some touching up and caulking to do, but I was tired of messing with it today. :)
We all stood in front of it last week commenting on how much we liked that it’s inset – it makes it look like it’s been their forever, like something you’d see in an old house:

The one thing Mike (handyguy #2) mentioned later was that he wished he had thought about adding lights underneath that I could dim – what a great idea! Wish I had thought of that. ;)
But honestly I don’t think I could be happier!

I was willing to give up some square footage in the family room – I actually wanted to go out a little further. But the guys didn’t want to take it too far out and now I know that was a good call. Overall the wall comes out about a foot more than it did before.
We don’t even notice it in the least though – it feel like it “fits” in the room SO much better! It really feels like it was always like this!
I have all kinds of ideas running through my head for the wall above the mantel – some kind of molding treatment. But I’m really digging the simple, clean look right now – I don’t know if I’ll even add anything:

It’s so surprising to look at the before and after – the before looks SO busy and overwhelming to me. And now it’s bigger and even more of a statement but it feels simpler and easier:

Oh happy day. :)
So there you go…what I’ve been up to the past couple of weeks. Can’t WAIT to decorate this for Christmas! The guys even moved the outlet (behind the candlesticks) so I can still have my twinkling lights up there.
It took a little help from the professionals (building a wall isn’t in my repertoire, but I’m working on it!), but I was able to fix the thorn in my side. I am so thrilled! Do you have something about your house that drives you crazy? Have you thought of a million and one ways to fix it? ;) Actually done it?
**You can see how to make that mossy letter here! And no, it’s not upside down. I promise. :)
 I pose that title as a question because the answer is questionable. The walls haven't come down yet, so I think I was successful. Maybe, YES, I can tile.


 I love how it ties the creamy of the marble tub, the white of the walls, and the green accent color all together! Yes, I am a happy crazy woman.
 I'm going to do a little accent of this by our sinks to tie it all together, and I'll take pics of that process start to finish -- I won't be so
