There are lots and lots and lots of pictures here, so this is a very long posting.
Supplies required (beside your basic tools e.g. glue/scor-tape, etc.):
2 3-1/2"-square chipboards,
1 12"x12" cardstock,
2 clear acetate 2 7/8" x 5" (or 5 1/16" is better),
designer paper to decorate
These are the 3 templates. You can probably figure them out yourself as I've put details on them, but the following pictures and explanations might make it easier. I'm breaking this down into 3 parts.


Cut out two 3-1/2" square chipboards. You only need one for the box, the other one is for the lid.
 Round the corners.
 Cut out 4 designer-paper squares of the same size.
 Glue to the top and bottom of each chipboard square.
 Draw diagonal lines from the corners of the frame.
 Draw lines 1/8" away on both sides of each diagonal lines.
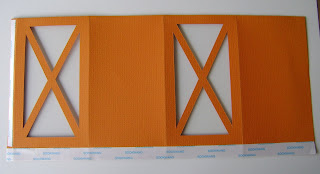
 I've drawn heavy lines where now you should cut away with your craft knife.
 Apply 1/4" scor-tape on the frame of the window.
 Peel off the protective paper (or whatever you call it) and place the clear-acetate rectangles in place.

 Apply 1/4" scor-tape along the top, peel off the paper and fold the top of the box toward you. This will double the strength of the top rim of the box.
 Flip over so now the outside of the box is facing you. Apply 1/2" scor-tape along the bottom of the box. Apply 1/4" score-tape along the vertical edge of the box. Peel the protective paper off this and close the box by bringing the open edges together.
 Cut the corners of the box to the score lines as shown.
 Fold along the score lines.
 Peel off the protective paper.
 And center the box on top one of the chipboards. I actually prefer to use glue here as with the scor-tape you have to get it right the the first time. With glue, you have several seconds to reposition it if you're off centre.

 I cut out a square piece of designer paper ( 2 7/8" square) to line the bottom of the box so it looks nicer.
 Score along the broken lines. And then cut along the lines that have been darken below. Discard the pieces that are marked with and 'x'.
 Fold along score lines.
 Apply 1/4" scor-tape along the outer edges.
 Peel off the protective paper and form the little box for underneath the lid.
 Center it on top of the second decorated chipboard.
 This lid should fit snugly into the rim of the top of the box.
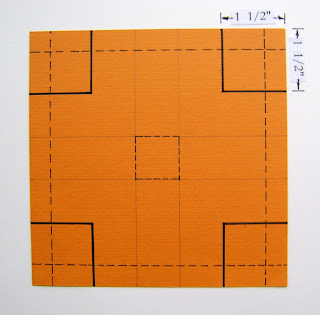
 Score 1/2" from each of the 4 sides and score a one-inch square in the centre of the paper.
 At each of the 4 corners, cut off a 1 1/2-inch square as shown below.

 From the corner of the 1-inch square in the middle, score 3 diagonal lines to the points at the corner of the paper as shown above.
 Round the corners.
 Cut out 4 designer-paper squares of the same size.
 Glue to the top and bottom of each chipboard square.
Now for the walls of the box. Cut out 6" x 12" cardstock. The side of paper that's going to be the inside of the box should be face up now.
 Score lines as indicated. DON'T draw the broken lines like I have. I've only done them so you can see where the score lines should go.
Horizontally at 2 15/16", 5 7/8", 8 13/16" and 11 3/4".
 Score lines as indicated. DON'T draw the broken lines like I have. I've only done them so you can see where the score lines should go.
Horizontally at 2 15/16", 5 7/8", 8 13/16" and 11 3/4".
Vertically at 3/8" from the top and at 1/2" from the bottom.
Now to make the windows on 2 alternating sides of the box, draw a frame 3/8" from the score lines.
 Draw diagonal lines from the corners of the frame.
 Draw lines 1/8" away on both sides of each diagonal lines.
 I've drawn heavy lines where now you should cut away with your craft knife.
 Apply 1/4" scor-tape on the frame of the window.
 Peel off the protective paper (or whatever you call it) and place the clear-acetate rectangles in place.
 Apply 1/4" scor-tape along the top, peel off the paper and fold the top of the box toward you. This will double the strength of the top rim of the box.
 Flip over so now the outside of the box is facing you. Apply 1/2" scor-tape along the bottom of the box. Apply 1/4" score-tape along the vertical edge of the box. Peel the protective paper off this and close the box by bringing the open edges together.
 Cut the corners of the box to the score lines as shown.
 Fold along the score lines.
 Peel off the protective paper.
 And center the box on top one of the chipboards. I actually prefer to use glue here as with the scor-tape you have to get it right the the first time. With glue, you have several seconds to reposition it if you're off centre.
 I cut out a square piece of designer paper ( 2 7/8" square) to line the bottom of the box so it looks nicer.
 Score along the broken lines. And then cut along the lines that have been darken below. Discard the pieces that are marked with and 'x'.
 Fold along score lines.
 Apply 1/4" scor-tape along the outer edges.
 Peel off the protective paper and form the little box for underneath the lid.
 Center it on top of the second decorated chipboard.
 This lid should fit snugly into the rim of the top of the box.
This part took me the longest to do. I went through several revisions before I ended up with this one.
Cut out a 6"x6" piece of cardstock.
 Score 1/2" from each of the 4 sides and score a one-inch square in the centre of the paper.
 At each of the 4 corners, cut off a 1 1/2-inch square as shown below.
 From the corner of the 1-inch square in the middle, score 3 diagonal lines to the points at the corner of the paper as shown above.
 Then make the folds along the score lines. Look at the template for this one. As I indicated there, the middle diagonal line at each corner should be a valley fold. The rest of the lines are mountain folds. I should look like this now.


No comments:
Post a Comment