Showing posts with label Tutorials. Show all posts

Thursday, November 10, 2011

Die Cut Pumpkin Centerpiece


We have a fun challenge at Joan's Gardens this week and I have created another centerpiece using dies.   The products used are Spellbinders Classic Scallop Oval and Scallop Circle dies for the pumpkins.  The leaves on the pumpkins and scattered around the bottom of the pumpkins were die cut using the Cheery Lynn "SM Leaves" (D133 and D134).  The vine on the pumpkins was die cut using the Marianne Designs "Garden Branch" (LR0151).  The doily under the centerpiece was die cut using the Cheery Lynn "Mega Italian Flourish" doily (DL159).


In this picture you can see the leaves around the candle and pumpkins better.  They were die cut using mustard card stock and sponged with different colors of Distress Inks.

To create the pumpkins, I die cut 15 Spellbinders Circles for the small pumpkin and 15 Ovals for the taller pumpkin. You can die cut any amount you want, according to how full you want the pumpkins.   Each circle and oval was folded in half and creased with a bone folder.  To build the pumpkin I used "Yes" Glue.  This is a thick paste glue and holds the pumpkin together really well.  I used an old "icing" knife to spread glue on one side of the folded pumpkin then added another folded piece adding glue to the top of that one, etc.

T


It was easier to divide the stacks into 3 attaching 5 pieces, then going back and attaching the three together.  The nice thing about using YES Glue is that it is thick and will slide easily so you can match up the scallops as you attach each one.  You need to be sure and keep the sections separated after you have all of them attached to form a pumpkin. I forgot to mention that I cut off one scallop from the folded piece, on the bottom of the pumpkin so it would be flat to help it stand up.   In this picture you can see a little brown stem I had cut to place in the center at the top of the pumpkin.  The little candle is scented "pumpkin" and is in a little clear holder.  A piece of design paper was die cut using the Cheery Lynn "Anastasia border" (B136).  It was wrapped around the candle and attached together with a small glue dot.

The pumpkins and candle were attached to the doily with glue dots.  The leaves were attached with a small amount of YES Glue.  I worked on my Teflon Craft Mat so the doily would not stick to anything.  Once it was dry I could move it.

It was a lot of fun creating these cute little pumpkins for another centerpiece in my home.  I hope I gave you another idea for using dies for our challenge at Joan's Gardens.  I hope you will join us.  We love to see all your creative ideas. 
As you know, all the products I use can be purchased from Joan's Gardens.  Have you checked out all the "Autumn" products Joan is featuring this week.  Some items are very limited but there is a great variety to choose from.

353200


Tuesday, November 8, 2011

All White Merry Christmas plus Mini Tutorial


 This morning I was waiting to leave for an appointment and had about 45 minutes to spare, so decided to try creating a card I had an idea for.  This is the result.  Don't you love the new Memory Box dies you can now get from Joan's Gardens.  The Christmas tree is the "Winterland Tree (98168) and the pretty bows are the "Crisp Bows" (98197).  The border around the card was created with the Martha Stewart "Double Arches" border punch set.  I think that punched frame is perfect with these dies.  I didn't want to take time to figure out colors so created a totally white card.  In the photo below I show you how I laid out all the dies for this card.


 I used the Spellbinders "Grand Calibur" die cutting machine and was able to lay out all the dies I wanted to cut for this project.  For the "gift packages" I used a variety of my small square and rectangle Spellbinders dies. I think they made perfect gift packages.   You can also see the Winterland Tree, the bows, and the Memory Box "Star of Wonder" dies (98167).  After die cutting these dies, they were also embossed.  I doubled up some of the bows to create a "fuller" bow on some of the packages, so additional bows were die cut.  All the die cut elements were arranged on the card adding dimensional dots under some of the "gifts".  The sentiment is from the JustRite "Sparky and Friends" stamp set.  To add some sparkle to this white card I decided to use the "Quickie Glue" pen to add glue to the bows and tree then sprinkle with diamond dust glitter.  The corners are from the Spellbinders "Parisian Accents" die set.  Clear rhinestones were added to the packages and tree to complete the card. 
You can purchase all these products from Joan's Gardens. 

Have you been over to Joan's Gardens to check out all the Autumn items she posted to day and see her beautiful card.  I love how she added the embossing to the pumpkins, don't you.

351565

Thursday, November 3, 2011

Joan's Weekly Challenge - Create a Box


It is time for another Weekly Challenge at Joan's Gardens.  This week we want to show you how to create a small gift box with a band.  This style box is called "Mini Pizza Box".  There are tutorials on how to create this box at SCS and also Sherry Cheever has a video.  The measurements on my box are the same as these but the way I complete it is a little different, which is explained below.  The band I created is a 1" strip lined with a slightly wider band.  The design paper used on my box is from the Graphic 45 "Christmas Emporium" 12x12" paper pad.  The pretty poinsettia was created using the Heartfelt Creations "Petite Poinsettia Precut Set" (HCPC 3415).  A Cheery Lynn "Holly Flourish (B148) and Geometric Snowflake (DL176) were added under the poinsettia.  The tag is also from the Graphic 45 Christmas Emporium pad.  A small bow was added at the top of the tag.

Mini Pizza Box Tutorial


 Start with a piece of card stock or double sided design paper cut 6" x 11".  Place on ScorPal, with 11" side along the top.  Score at 1", 5", 6", and 10".

Turn paper so 6" side is going across top of ScorPal.  Score at 1" and 5".

Use a bone folder to crease all score lines.  This is where I have changed my directions.  Cut from the short end to create "tabs".  Do this on both ends.  Then cut "tabs" along score lines in the middle of the box.  The reason I want you to cut the tabs from the end is to create a box without the seam showing when looking at it from the front.  There are two pictures below to show you the difference when you cut from the short end and how it will look if you cut the tab on the side.  
 
Place ScorTape or a strong adhesive, on each of the tabs.


Start by folding the center tabs in on one side of the box to form the bottom of the box.  Next fold in the end tabs to form the top and the bottom of the box.

Below are examples of how corners will look according to where you cut the tab.

Front of box will have a smooth front if tabs are cut from the short end.

If you cut your tabs along the side, the front edge of your box will look like this.  The box will work the same but I like the way it looks it the first picture.

Next create a band that will slip off and decorate it.  Cut a 1" strip for a "belly band".  Wrap it around the box, creasing on the corners, and attach ends with a strong adhesive.  This band will slip off the box.  Now you can decorate the band with any embellishments you like and add a tag..

Go over to Joan's Gardens to get complete information about this challenge.  I'll be looking forward to seeing your boxes.

Thursday, October 27, 2011

Joan's Gardens Challenge - Creating a Snowy Background


The Challenge at Joan's Gardens this week includes a technique. We thought it would be fun to teach you how to create a fun background. Above is my card completed using this technique.  You will be able to see the snowy background better in photo below.  The stamps I used are the two new Heartfelt Creations  "Magnificent Spruce Trees" (HFC 3432) stamps from the Classic Christmas Collection.  I wanted to make the larger tree the focal point and use the stamp with the three trees to create depth in the background then create a snowy scene without using stamps -- this was done by using water!   I have never seen this technique before - it kind of happened by accident and I love the results. I'm going to call it "Snowy Background Technique".  After completing the background, I added some die cuts to complete the card -- they are the Marianne sleigh (LR0178) and reindeer (LR)179).  A gold cord was used to connect the two images.  The corners are from Spellbinders.  The flourish is one of the new Cheery Lynn dies "Holly Flourish" (B148).  The flowers were punched using the "Super Giant Lilacs/Daphne"  Punch  shown below:


Now for the Challenge

This week Joan and I would like to challenge you to create a card using the following technique.  We would like for you to create an "outdoors" scene using tree stamps, if you have them, but you may use any other stamps.  The challenge is to do the "snowy background technique".   You may embellish your card any way you would like.


Here are the steps taken to produce the snowy background for this challenge:

Step 1:   you need a piece of Glossy Card Stock, a light ink and a darker shade of ink.  Blend (or sponge) the lighter ink over the glossy card stock covering the entire piece.

Step 2:  It is hard to see in the photo, but the glossy card stock is completely covered with light green ink.  Next use VersaMark Ink and ink up the stamp you want to use in the background.  Stamp onto the sponged background.  I stamped the three trees  twice, reinking the stamp before stamping the second time.  It will be really hard to see your stamped image at this point.  Use your heat gun to dry the ink.


Step 3:  Use a darker shade of ink and sponge all over the front of the card.  The more sponging you do around the stamped images the better they will show up.  Be sure to add the darker ink all over the entire piece.


 Step 4:  Use the embossing buddy and rub it all over the the card.  Ink up the stamp that will be your focal point with VersaMark Ink and stamp it.  You will notice that part of my larger tree is stamped over one of the smaller trees in the background.  The background is a smooth image so the image you white emboss will stamp perfectly.  See how the trees in the background seem to add depth to the  card.


Step 5: Next you will need a spray bottle with a fine mist.  With your card on the table, hold the spray bottle up about 10 inches and lightly mist the entire front of your card.  Do NOT over spray.  It takes a little while for the water to do it's thing - it will remove some of the ink and create a "snowy" effect.  I did not use a heat gun to speed up this process.  Once you can see the water spots you can decide if you want to lightly spray certain areas again.  Warning - if you spray too much you will get a washed out area.  I like this technique using the trees because it looks like snow falling.   You now can add additional embellishments or just use this as your entry in the challenge. I think these trees are so beautiful you really don't even need other embellishments.   Be sure to go over to Joan's Gardens and link your card to the challenge.  We always look forward to seeing your beautiful cards.  You will be eligible to win a prize plus the winner will be in the drawing at the end of the year for a $100 gift certificate to Joan's Gardens.

Below is how I completed the inside of the this card.

 The sentiment is from Penny Black, the trees are from Heartfelt Creations, and the Christmas Sleigh Border (B140) from Cheery Lynn.


I hope you will join us in the challenge this week at Joan's Gardens.


Wednesday, October 5, 2011

Joan's Gardens Challenge - A Decorated Bag Mini Tutorial


It's time for another new challenge at Joan's Gardens.  This week we want you to create a FALL or Trick or Treat BAG with a topper. You can get all the details from Joan's Blog.


I decided to create a Trick or Treat bag using a lot of different products from Joan's Gardens.  I decorated a kraft bag with handles and have a mini tutorial below to show you how I created the topper.

The design paper on the bag is from the Graphic 45 "Halloween in Wonderland"
8 x 8" paper pad. 

To create the "topper", I used Kraft card stock.  First I decided how deep I wanted the topper, then doubled it, and scored across the middle and creased it will with a bone folder.  Using scissors I cut a small opening along the fold line that was just a little longer than the width of the handles.  I wanted to create a design on the front edge, so used the Cheery Lynn "Tiffany Border" (B137) die.  I taped it to the edge of the topper then die cut it.


After it was die cut, it cut the border out along the edge leaving an opening along the bottom edge.  I wanted to add the border back over the opening, plus wanted a color behind it.  

A strip of card stock was added it to the back of the topper over the die cut opening.

 When I added the die cut back into the opening, I placed it slightly higher so it left some of the color below the scalloped edge. The die cut was glued along the very top edge, to the edge on the topper.  A piece of the stripped design paper was added right above the die cut edge to give it a finished look.  I used grungeboard letters from Tim Holtz Idea-ology Mixed Minis alphabet for the "Trick or Treat" letters.  Distress Ink Stain Daubers were used to color the letters, to match the colors in the design paper.  I love how they turned out.


To decorate the top edge of the topper, I used the Sizzix "Autumn Gatherings" (657454) die, which has branches, acorns and different small leaves.  These were all arranged across the top.  All these dies are pictured on my last post.

For the Jack-o-Lantern I used the Sizzix "Pumpkin Jack" (657463) die.  This is the way it looked when cut.


I wanted to give the surface a texture so used the Wendy Vecchi "Funky Flower Art" stamp set.  In this set is a large background stamp that I clear embossed over the pumpkin.  The Jack-o-Lantern face was cut free hand from black card stock and glued to the pumpkin.


The pumpkin die includes the stem.  I die cut it using green card stock then embossed it with the Cuttlebug "Distressed Stripes" embossing folder.  To complete this bag, I die cut a lot of leaves using the Cheery Lynn Leaves dies (D133, D134, D135, and D136).  I used a variety of leaves from each of these sets.  The large acorn on the bottom is from the Sizzix Mini Acorn & Pumpkin Set (657457).  The handles of the topper were pushed up through the opening that was cut in the center of the topper to complete my Trick or Treat bag.

All the products used on this project can be purchased from Joan's Gardens.  Please go over to Joan's Blog to get all the details about this week's challenge. 

327550

Wednesday, September 21, 2011

Joan's Gardens Weekly Challenge #3 and Card Box Tutorial


Every Thursday it is time for a new weekly challenge at Joan's Gardens.  This week we have something different for you.  Joan has completed the card for the challenge and I have the second half the challenge here, which is to create a box for your card.  You should start at Joan's blog to get all the information.

I have had a lot of people ask me how I mail out my cards since most of them are very dimensional.  I thought I would do a tutorial for you and we would incorporate it into this week's challenge.

I am sending out the above birthday card, which I posted here, and needed a box to put it in.  I think this box would be sturdy enough to use alone to mail off the card, but I put them into a padded envelope because I like to decorate the outside too.

Below are the instructions on how to create a box for your dimensional cards.

My card is 5.5" x 6".  You can use these directions to create a box any size to fit your card.   For the bottom you need a piece of card stock that is one inch wider and longer than your card.  For my card I cut it 6.5 x 7".  It is scored all the way around at 1/2".

This is the outside of the bottom of the box.  You need to cut a slit, up to the score line, on all four corners.  In the picture you will see the score tape on these corners.  Fold in the tabs to create your box bottom.


 For the lid you need to cut it 1/16" of an inch larger than the bottom, on  two opposite sides.  For my card  it is 6.5" PLUS 1/16" and on the other side it is 7 1/16". This extra 1/16" will allow the lid to fit over the bottom to close. You again score it at 1/2" all the way around.  On the front side of your lid, you will again cut up to the score line and attach ScorTape to the tabs to create a box shape, like for the bottom.  Do not do this to the other end.  We are going to attach the back of the lid to the bottom of the box.


On the backside of the lid, you want to cut off those two tabs as shown in this picture.  Place the ScorTape along the long edge.  I rounded off those two back corners for a neater appearance.  Place the lid over the bottom of the box.  Pull off the protective covering on the tape and press it to the side of the bottom of the box. You now have a hinged lid on your box.

The box will look like this when opened.  My card fits perfectly inside the box.

To decorate the top of the box, I die cut a doily from the Marianne LR0180 doily set.  There are three doilies in this set plus a corner.  I wanted the box top plain but wanted the doily to standout, so I placed the bottom half of the doily into the Sizzix "Flourish & Dots" (656980) embossing folder so there would be texture on the bottom half.  On the top portion of the doily I used a Heartfelt Creations  birthday stamp then added a bow.

I hope you will join us this week in the challenge at Joan's Gardens.  All the details for the card are on Joan's Blog then you can complete the box for it from this tutorial. There will be a random drawing for a winner from all entries in this challenge and someone will receive a prize.  The winner will also be in the drawing for the $100 gift certificate to Joan's Gardens which will be given away at the end of the year.  Wouldn't you love to win that prize!

318623

Saturday, September 17, 2011

Little Box plus a mini tutorial


This is such a cute little box for a small gift.  I plan to fill it with some good chocolates to be included with a birthday gift.  

This is a die cut box.  It is one I received from Joan's Gardens called "Rectangle Box" by Sizzix.  When you die cut it, it cuts a bottom and a separate lid.  Below is a picture of the back of the box to show you how the two pieces are connected. 

 After scoring and taping the bottom, you attach the lid with brads.  I love this look.

 I used a piece of "My Mind's Eye" 12x12", double sided design paper.  It was cut in half to fit right on top of the die.  For the front closure I used an embellishment I received from Joan's Gardens, probably last year.  It says exactly what I wanted it to say.  This person is super happy to receive good chocolate so "Joy" is perfect.


For the top I created a rose with the new Spellbinders "Spiral Blossom One" die.  I thought I would show you a picture of the die cut flower and then explain how I shaped it to make it easier to roll into the spiraled rose.

When you die cut the "Spiral Blossom One" this is what it looks like.  It is perfectly flat and you need to roll it starting from the outside edge, which will become the center of the rose.

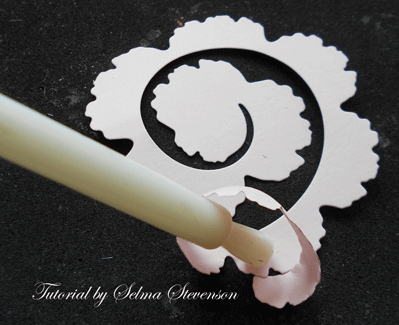
You know how I like to make my flowers as realistic as possible, so I use the tools from the Flower Tool Kit, you can get from Joan's Gardens, to condition this strip. I sure do get a lot of use from this Tool Kit! I used the large white tool to "cup" each of the petals, going all the way around the spiral.


By conditioning the card stock with this tool, you can see how it helped to "cup" the petals and it has already started the spiraling process without me trying roll it to get  the flat piece started in the spiral. This process made it very easy to roll it into the flower shape.


But before I actually started rolling the spiral, I turned the spiral over and used the largest stylus tool in the Flower Tool Kit to shape the petals back on the tips.  You just go around in small circles on the very edge of each petal.


The rose was placed on top of Marianne (LR0157) Decorative Elegance die cut and a few Martha Stewart punched branches tucked in around the rose.


Since I used double sided paper, I used the solid portion for the outside bottom of the box and the patterned side for the lid.  This is reversed on the inside which gives it a nice completed look.

You can order the Sizzix Box Die and the Spellbinder Spiral Blossom One die from Joan's Gardens.  This little box really was easy to put together and I think you will love working with it.  I hope you enjoy the mini tutorial on how I created the rose.
The weather has really cooled down here in Washington but I guess it is about time for Autumn to arrive.  Have a wonderful weekend.


316046