Showing posts with label Hall Bath Redesign. Show all posts

Tuesday, January 4, 2011

More Stencil Happiness!


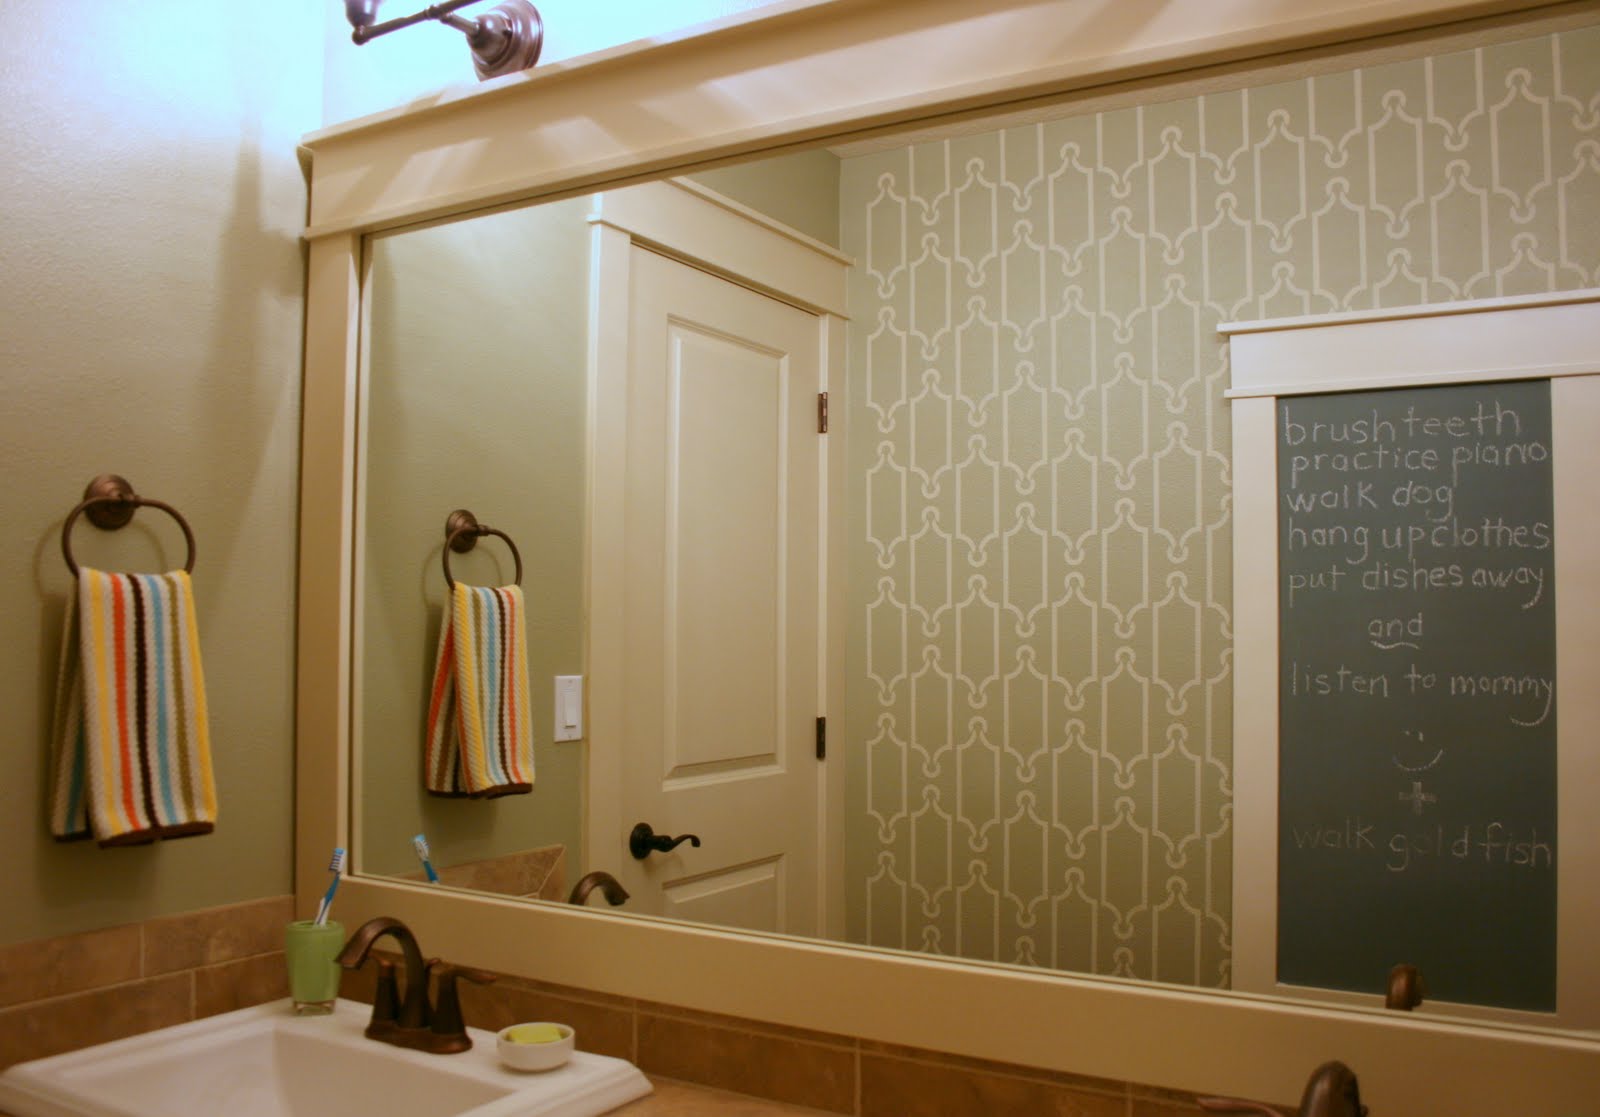
Adding pattern to one wall in the hall bath with a stencil has brought in a nice dose of happy charm. I love it! Now if I could just photograph this small space to represent how it looks in person...this part of the project has not been easy to accomplish. A few tilted shots seem to help, hope you don't feel dizzy!

(And by the way, my husband did wrap up my dream camera this holiday! But, can you believe the wrong lens was sent? Once it arrives I hope to see some improvement in the photo department of this blog.)


before


after


The height of the room seems to have increased!


Are the reminders on the chalkboard helping? I actually think they are! Written backwards, when Isabella  and Max face the mirror the list becomes legible.


A big thanks to Whitewall & Co., who made this custom stencil for me. I'm sure to use it again someday, somewhere...


p.s. I'm linking up this post to Wendy's Frugal Friday's Linky Party!

Monday, January 3, 2011

Returning To The Hall Bath Redesign To Stencil A Wall


One of the rooms I worked on last summer was Isabella and Max's bathroom, adding a frame around the plate glass mirror and other small projects including installing new light fixtures, towel rings, a chalkboard for reminders and applying a new paint color. The plan was to also paint a stenciled pattern to the wall opposite the mirror, but before that could be accomplished I had to move on to other jobs.

What better way to start the new year than to address an uncompleted project. So I pulled out the stencil and materials to get started!


hall bath before


after


This is the wall that is about to get dressed up with the stencil pictured below.


The stencil was made for me by Whitewall & Co. based on a design I have used in previous projects, seen here and here.


Using a stencil brush, paint matching the millwork in the room, paper towels and a ruler I got to work.


After determining the layout of the pattern on the wall the stenciling began.


The portion of the wall covered by the chalkboard is marked by tape. Why take the time to stencil behind it, I say!


For more specific details on how to stencil a wall, see the tutorial written for hgtv.com by clicking here or here.


Look for final pictures of the completed room and this wall tomorrow, only several months after I began working on the Hall Bath Redesign. But...better later late than never, right?

Tuesday, August 24, 2010

I Think I'm Being Ignored


The point of hanging a chalkboard in Isabella and Max's bathroom was to have a place to jot down some of their responsibilities, as a reminder. I pondered whether or not there was any chance it would help in this post. I loved the comment from Autumn, author of the blog design*dump:

"probably not! they'll still need some coaxing from mom! maybe you could write the message backwards, so they can read it when they are standing in front of the mirror! might make things a little more exciting for them to have to "decode" the message."

I thought this was a great suggestion! So I wrote the reminders backwards.


Can you believe they haven't noticed yet?! A full two days later. Come on, the message could not be more clear when standing at the mirror. (And Max is a great reader...no excuses there!)

Or perhaps they are simply ignoring me? Most likely. Kids...


Then, just look at this pretty fabric! Based on the happy and bright colors, you can see I am in no way ready for fall. Later in the week I'll show what the beautiful print has become...

Tuesday, August 10, 2010

Look, My Bathroom Mirror Frame Has A Twin!


I was absolutely delighted when I visited Jenny's blog, Evolution of Style, after receiving an email from her yesterday morning. She asked me to come take a look, my bathroom mirror frame project had inspired her to frame a mirror in one of her bathrooms. If you write a blog I don't have to tell you that it is work, but when people share that something you've done has inspired them, it certainly makes it worth the effort! Here is the fabulous job she did:

"After admiring so many mirror transformations in blogland, I finally found one that inspired me into action. Janell, of Isabella & Max Rooms, recently did an amazing mirror makeover, and since it didn't involve mitre-ing (is that a word?) corners, I decided, this is the tutorial for ME!"

before


"I hit Lowe's for my supplies, and fortunately, didn't need to buy too much. Some primed MDF for the frame, paint and wood glue. I decided that I would start small on the project and do the mirror in the kids' bathroom to get my feet wet. I figured if I could do their bathroom, I would learn from my mistakes and doing our master bath mirror should be a piece of cake, right?

...I was able to complete this project within a day, although I did buy the supplies the day before. But, it's definitely a completely doable weekend project. I have the frames for my master bath mirror in the garage now, and the only thing keeping me from putting the mirror up tonight is that I didn't pay attention and have to go back to Lowe's and get two more pieces of MDF, since I bought the wrong width for the top piece! Argh!"

after


"What a difference! A big shout out to Janell for such a great tutorial - I will be waiting for her next woodworking demonstration, "How to mitre corners". :-)

Until then, I will press on with my master bedroom mirror makeover. Of course, I have to go to Lowe's first."


Thanks Jen, you've inspired me and I love that my mirror frame already has a twin!

And now to answer a few of the questions I received after posting the tutorial, which were answered in comments but I also promised I would cover them in a follow up post.


Laurel @ Ducks in a Row said...
My mirrors have the clips, also, and I've always wondered how I could do this with the clips - so you just removed them and glued the mirror to the wall?


Yes Laurel, the mirror had two clips attached with a screw at the top of the mirror. I unscrewed them just enough to be able to pull the mirror out from the wall to "inject" some of the adhesive behind the mirror. The clips were then screwed back into place, holding the mirror against the wall until the adhesive dried and then were removed.

Rebecca said...
Janell,

I have one question for you in regards to mdf sizes you used. What is the depth of the pieces you used? Are the pieces that are installed directly on the mirror the same depth as the wide center piece that is installed directly to the sheet rock? Does this make sense?

Rebecca, yes, it does make sense. All the pieces are 5/8 inch thick.

I definitely need to do a follow up post. I placed a 1/4 inch thick "block" on the back of the top frame piece along its top edge. This allowed the top frame piece to be attached on the same "plane" as the side pieces applied directly to the mirror and the bottom piece applied directly to the tile.

1/4" wood block placed at top of frame shown below


Jane Ellen said...
it seems like the top piece and bottom piece would set back farther than the side pieces that are places on the mirror....did this not create a problem?


Hi Jane Ellen,
Great question...the tile below the mirror is virtually flush with the mirror surface and the bottom piece extends over the mirror about an inch, the top frame piece extends down over the mirror about two inches, so all the trim pieces do end up flush. The only thing I did not mention in the post, but talked about in the comments, is how I placed a 1/4 inch thick "block" behind the top trim piece at the top edge to help "hold out" the trim attached to wall rather than the mirror.

Another great tip came in from a comment from this talented designer:

Sally J said...
As always, your project turned out perfectly! I have had carpenters frame out several mirrors for clients and it really transforms the bathroom. The only thing they did differently was to rout out a cut out in the back to lay over the mirror, but yours works just as well. Thanks for instructing everyone to paint the back....very important and not a step to be missed. Great tutorial, Janell, and a wonderful result!


I hope this answers any of your questions, particularly if you didn't see the questions and answers in the comments. And as I said in another comment, each mirror will present a unique set of issues to work out for a successful result.

Happy Mirror Framing!

Friday, August 6, 2010

Framing A Bathroom Mirror - Final Pictures


Before

Paint, new light fixture shades, towel rings, a chalkboard, accessories and a mirror frame make a big difference.


Yes, I've resorted to a few angled shots. Here it was the only way I could get the entire top of the frame in a photo. I received a lot of suggestions after mentioning what a hard time I was having photographing this small space, particularly regarding lenses. So, when I get a moment, I'll be looking into what lens will help with this issue. Thanks!


This is probably my fastest redo to date...the vanity area of the bathroom is complete with the exception of the stenciling I plan to do. More on that next week, as I have made a decision on which stencil to use. I'm excited to be having Whitewall & Co make a stencil based on one of my designs. The pattern won't be painted on every wall, but just enough to soften the space and add another layer of interest.


Have a great weekend and look for my latest Houzz Ideabook tomorrow, which covers the fun trend of mixing a variety of chair styles around dining room tables.

Thursday, August 5, 2010

Framing A Bathroom Mirror

Framing a plain plate glass mirror can transform a bathroom, and as I found out, it isn't that hard to do. For this project the same frame design and materials used to make the chalkboard message boards were used to frame the mirror in Isabella and Max's bathroom.


This is the first mirror I've added trim around, and was a bit (very) nervous about how it would all turn out. The hardest part was making sure I had accurate measurements, before heading off to Home Depot to buy strips of primed MDF baseboard to be cut down to size. (Tip: double check the measurements of the cut pieces before leaving the store...just in case!)


Once home I laid out the cut lengths on the kitchen island. I was going to work on this project after the kids went to bed and had no desire to be stuck in the garage into the late night hours!


Earlier, on a trip to my local Sherwin Williams store, I got these recommendations to help the project go smoothly. X-I-M, a paint extender to help minimize brush strokes while painting, and their new Handy Paint Pail. I was skeptical about the pail, but the salesman talked me into giving it a try. It has a handle, removable liner and a magnetic brush holder providing a handy place to set the brush while working. I have to say, it really was a help and certainly tops the random plastic containers I've used in the past. (And no, I'm not getting paid to write any of this!)

With all my materials on hand, the painting began. As opposed to the chalkboard frames, which I painted after they were built, here I decided to paint the pieces first. I thought this approach would be easier than trying to paint the frame once it was in place around the mirror.


First the back sides of the baseboards were painted. A thin sliver of the back will be reflected in the mirror, so they definitely needed to be painted.


After the paint dried the strips were turned over and the fronts painted. The paint extender was very helpful in minimizing the appearance of brush strokes.


After the paint dried an extra fine sanding pad was used to sand away a few paint drips and areas that were a little rough.


The next step was to glue the three pieces, which form the top of the frame, together with extra strength wood glue.


Later in the day, after the glue dried, a bead of caulk was run down the two joints...


and smoothed out....then more drying time. (Lots of periods of drying time in this project!)


An hour later a quick coat of paint was brushed over the caulk.


And while I was at it, a second coat of paint was applied to all the pieces.


After more drying time, the frame was then installed around the mirror using Liquid Nails-Paneling. This is a wood molding adhesive that claims to create a strong instant hold. Trusting this information several dollops were applied down the length of the wall above the mirror.


The top of the frame was positioned in place over the adhesive. After checking to make sure the ends were flush with the mirror on each side, it was taped into place. I admit I did stand there holding and pushing it into place for a few minutes before stepping away. I had visions of it crashing down, damaging walls on its way down to the vanity to crack a sink or two. Luckily that didn't happen as the product lived up to its promise.


Next the same steps were taken to attach the side pieces and finally the bottom strip.


DIY Challenge: hold and apply adhesive with a caulk gun using your right hand while taking a clear picture with your left, and you must be right handed.


The last steps were to caulk a couple joints...


and touch up the areas with paint.


You've basically seen the finished result, but I'll post a few shots tomorrow with all the pretty and colorful accessories in place. I am seriously excited about how well this turned out and realizing with this and the chalkboard project "under my belt" I can move on to some other fun projects using similar products...like crown molding? The rooms of my house are going through my head as I write, which room do I start with?!