Showing posts with label outbuildings. Show all posts

Thursday, July 16, 2009

Character outbuilding - Part 4 - all jewelled up!

I've given up attempting to kill the wasp nest that's keeping me from finishing the outbuilding. Because there are now TWO of them to deal with. Forgetaboutit. I can letter a firetruck, I can tile floors and pull an RV, and even yank up and fix a toilet. But when it comes to attempting to kill off something that is gonna try and get me back with stingers, NO THANKS. Come fall, I'll knock them down and hang up fake wasp nest things.

I kinda like the building a bit rough looking and unfinished here and there, because...


... the building has some new jewellery and is looking just fine!


What was once this...


Is now this. Ahhh... listen. The birds are happily chirping during this lazy summer day.


I scavenged old and rusted tools from my garden shed to add interest, with little/no colour. I wanted the coke sign and flowers to do all the talking and the rest, to simply be their background.


This funky round thing in the soil is a broken wheel base off a wheelbarrow you'll see down below. It adorns just the right amount of rust to make it a little interesting.


The license plate is off my previous truck. An antique one would be cool, however this one has meaning to me. That little license plate holds ALOT of memories.


The rusty patina on this old shovel is really exquisite in real life!


 The outbuilding resembles all the things I adore. Weathered elements, rustic appeal, my love of antique signs, with just a touch of pretty without it being over the top.

As for those silly wasps, they sure have a nice little hangout, wouldn't you say?!?

Thursday, June 25, 2009

Character Outbuilding - Part 3


Who wouldn't love an old weathered little gate up against old weathered wood? The gate will soon serve a purpose as well. Hurry up sunshine, I need you here!


This long box was not originally a planter box. It was a means of shipping firetruck parts into our country. Really. I stripe and letter firetrucks for a living so when I saw this shipping box in their burn pile, (after screaming and stamping my feet in total glee!) I got someone to help me shove it in the back of my truck. FAST like. And I put it right to work. I'm such a garbagemaniac.


It's been waaaay too long since I've done some real work on my character outbuilding. I'm still on the lookout to collect wood I need to complete it. However, I painted out the trim to match up to this planter box. It adds just the right amount of brightness to the little building, yet still has rustic appeal. And that is Jenna, my ever present shadow in the form of a dog. Where I go, she goes. Easy to please, ohhhhh yeah.

And this is what I want the gate to do one day. Hold up some gorgeous sweet pea flowers in full force bloom! I have sun on order. Hopefully before they get flooded out...


I just love this little bent up weathered gate! I scooped it from the dump while a guy was throwing it onto the pile. It went from his trailer right into the back of my truck. Gotta be quick while the going's good!
My intent for a garden around the character building has morphed. I had big intentions of cutting out a nice curvy bed to hug the building and add a ton of full bloom full grown perennials of course. (right..) But as luck would have it, my back and bank account spoke to me and requested to stick with the free planter box and free soil from the garden idea for this year. Ok, ok...

Some good news! I reclaimed some old shake shingles! I can either tinker with them on the building, or... I have a bazillion different ideas for them. Hopefully this summer (soon) I'll get busy and share what I do with them.

Have you used anything unusual for planter boxes? When I went to pick up these flowers, the nursery had old toilets sprouting full blooms. Hilarious...

FYI...

I'm gettin' there!!
_______________________
Check out Kimm's Reinvented Trash to Treasure Tuesday, July 7 2009 edition to see what others are making out of those 'special finds'!

Saturday, May 30, 2009

A few of my favorite things

I happen to have an ever increasing favorites area I simply lable 'decorating inspiration.' When I glance at a picture, I don't simply look at the obvious. I look at every detail and analyze why I love it and what I could do to incorporate that 'feel' in my own home.

Some pictures have direct links to the websites I found them on. Others don't, so if you recognize any of these images, please feel free to give the owner's full credit in the comments section! However, I so wanted to include them, link or no link.

I love this fireplace for the white grout. Grout is generally dark, but the grout highlights each and every brick. That mantle would look wonderful in white too! What a great way to bring out the whites in the rest of your home.

The texture captures me with this picture everytime. I love the warmth of that rock wall. The thickness of the island creates such an unusual and substantial place to plunk yourself down.

This one is one of my coolest finds ever. The wall separating the kitchen from the rest of the house incorporates a very unique pantry that houses a metal sliding door. This is funky to the hilt!

What is not to love about this driftwood coat rack?


Ahhhh. I can sink into this by just looking at the pic. I LOVE the burlap against the whites. So refreshing and casual.


This one got me. Reason being, I was dreaming up how I could incorporate a gazebo in my own yard that would stand up to the high winds and pounding rain we get. I desire a special place to plunk my propane firepit that would somehow block off the wind. This inspiration has me thinking, fabricate a gazebo based on what kind of folding doors I can scoop up for that wind block in the desired location at any given moment! That way on a windless day, you still claim your full view. Awesome!


I LOVE the finish on this piece. It's white, yet looks so great weathered in very dark tones. I know exactly where I'll be adding this touch! I have a special reveal coming up one day soon! In my main entry, I scooped up a massively long bench and a horse gate, as well as an old dresser. That's all I'm giving you for now. :)


I LOVE how the surround is treated in this soaker tub area. This look has me holding off on the tile I had planned and on the lookout for something that is waterproof yet can have this look for my shower surround. I have no idea if there is such a thing, but I'm going to create it if it doesn't exsist! And isn't that barndoor exquisite? You can incorporate that door anywhere. On hallway closets, pantries, as a headboard... gosh I love those barn doors!

Do you have a few of your favorite things stored up somewhere? And what have you done with that inspiration?
If you care to share, post your link in the comments. I'd love to see! (one day I'll figure out the Mr. Linky deal, but not today. It's hot and sunny out and I need to press on with that entry way furniture today!!)

Have a great weekend, all!

Sunday, May 17, 2009

Character outbuilding project - Part 2

Yesterday I posted Part One of the character outbuilding project. And here's today's progress.


I have a door! And I cheated yet again. The wood strips weren't perfect width wise and my attempt at ripping one down to fit didn't go so well, so because of the magic yet again of all those screws, I undid my work and simply respaced the boards out abit to fit. I kinda like the gaps. I hope they look intentional...


I laughed when I saw this at a garage sale for $1. and stashed it away... and I laughed as I hung it up today. Anyone else like me, where the project is FAR from completion, however it's urgent to pretty it up right away?!? Naw, I must be the only one that does that. (snicker... I know all of you better than that)


I think this was meant to be a coat hook or something. The doorknob was on it's own board so I just screwed in the whole works.

Bees are WEIRD. For most of the day they buzzed and scolded me for hangin' so near their digs, having me scream and swat and then give up on the siding. My son was on guard and he was to tell me if they started swarming around me as I worked. It got to the point where there was too much damage control, so I left for abit. Upon returning, the sun had moved leaving the building in the shade and the bees were GONE. So that's how I got to work on the door! Whadda trip.

Regardless, there's progress today! I hope to continue with hopes of getting near a finish tomorrow weather permitting. (right.. shade vs no shade LOL)

I'm liking the door very very much. :) We shall see what I do with it tomorrow. A whole new day you know...
____________________
A late entry, but better late than never! I had intended this to be a part of Melissa's Procrastination Party After Photos for this one. Eh.. what's a few days late?

Saturday, May 16, 2009

Character outbuilding project - part 1


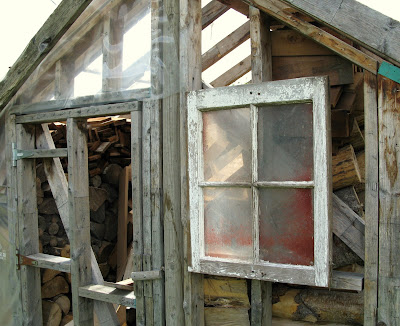
This is a little greenhouse I have tucked in my backyard. I use it to store my firewood. And it's currently an eyesore. I knew I wanted to eventually do something to it, but wasn't quite sure what. When my friend Vic gave me that old window, I knew exactly what I needed to do. Put the window to great use!

I then visited The Back Porch that houses many adorable character buildings for the perfect inspiration.


Today my little pile of free old fencing wood came out of hiding.


I took a scrub brush to it and removed all the moss and yuck while my son removed the nails. It was a beautifully warm overcast day, perfect for such a project.


Meet my best friend of today! I love this saw. If you don't have a circular miter saw, you need one. Just do it.


First thesmall window got a home... yup, looks good right about there. I predrilled holes first, then used screws to gitter done. Always use screws. It makes repositioning effortless. I positioned this window approx. 4 times if not more. Trust me, use the screws.


Anyone that knows anything about real wood construction would definately cringe. I don't have alot of building skills, but I'm pretty comfy with a cordless drill and measuring tape and the saw became 2nd nature fairly quick. I simply premeasured each board, and cut them to size, tapped the tonque and groove wood together and screwed them in with wood screws. I think they were wood screws... they were black, is that enough info? I don't care if they rust. All part of the added charm. I ensured I staggered the board joins where longer lengths were required.


Look! Cute!! I scooped up that funky gate from the dump too.

I had another old window with no glass in it which can be easily taken care of later glasswise. Remember, I screwed the window frame in so it's easy to remove! Then I cut the wood to fit around the positioning of the window.

The proper way to add windows would be to cut into the framing and add the right supports. I didn't desire to LIVE in this thing, so I didn't care about that part. The eventual glass will hide the framework. And I plan for the glass to get really dirty and stay that way, like that little window. It's all good!

I'm off to a great start! I plan for homemade shutters, window boxes with flowers, and a pretty little garden of sorts around this building. Perhaps even hang my garden tools on the outside during the summer months. And to find some old relics to decorate the outside with. I'm also on the lookout for some broken pathway stones. I have loads of dreams for this building!


Stay tuned for part 2, after I land abit of extra wood. A neighbour may replace their old shake roof shingles. How cute would the above effect be?!? Remember, I used screws. Anything is possible. Even partial redos...
____________________
Part Two is here!
____________________
Wendy at The Shabby Nest is having a Frugal Friday Linky Party for Friday, May 29, 2009. I thought I'd share my very frugal makeover of this little shed coming to life. Be sure to check out the party for some incredibly creative projects going on!

Kimba at A Soft Place To Land is having a Garden Party, June 15 2009 edition! My addition isn't the blooming variety, however go check out the link to see the latter!

Tuesday, May 12, 2009

Adorable character outbuildings!


I happen to have a framed greenhouse in my backyard that houses firewood of all things. Flappy crappy plastic snaps with every wind gust. The greenhouse could be adorable, but I needed some major inspiration.


On the weekend, I frequented a lovely little quaint place called The Back Porch. This home based business resides in Harrison Hot Springs, BC and is very unique. Not only in what you see, but what they do.

This is the main (gorgeous I might add!!) house. But outback, they specialize in roasting their own coffee beans on site. The fragrance is enough to drive you to eat the beans as is! There's also a pottery studio, as well as antiques sold outdoors. And the property is dotted with lovely character buildings that are used for a greenhouse, chicken barn, the antiques store, and a real working outhouse.

I needed some inspiration badly for my greenhouse project, so I thought I'd share my findings with you.


What is not to love?!? Old barn wood adorns every square inch. I love the little porch that hugs this one. Even the door is loaded with olde tyme shabby charm.


Antique accessories hang from every beam imaginable. And each building of course incorporates old glorious windows!

I love how the ivy makes itself at home and wanders where it desires. Note the unique way to display the clay ornament. On an antique dolly. Cool..

I so want that light! Isn't it neat how the outdoor tools look right at home stored on the outside of the building?


Now THIS is cool. The greenhouse is fabricated with old windows. Period. Obviously, the house was built around the windows to fit. Clever! I never tire of peeking at this building to see what's inside.


Lovely pots and accessories adorn every imaginable wall.


In the real chicken character barn, even the eggs have a unique home once gathered.


I LOVE how there are two directions taken with the wood clapping. And again, anything old against it simply looks like it belongs.

The property had lots of other accessories, and one of them is benches, which I will highlight in their own post soon!

I've already started collecting wood for my character building, but unfortunately, I didn't end up with as much as I thought I had. So the collecting will continue. I'm just so very fortunate to have found the most amazing inspiration for all the things I love.

Do you have a tool shed, potting shed, playhouse, or greenhouse out back that could use some old charm TLC? Consider using these character buildings as a wonderful reference to create something special right in your own backyard!