Showing posts with label furniture rehab. Show all posts

Monday, December 5, 2011

Bedside Table Before and After: Making Progress on the Princess' Bedroom~

If you follow me on Twitter, you may remember me talking about the fact that we painted the Princess' bedroom last week.  Bye Bye purple, hello to a crisp, clean white.  (Can't show you that part just yet...but it's coming soon, I promise.)

In the meantime, we have also been busy painting her bedroom furniture.  You see, we're working on a very strict budget, and her bedroom furniture is darling, and in good shape.  So we decided to re-use it.  It just needed a little TLC...and a new color.

Here is a sneaky-peek photo I shared previously of the fabrics we have chosen for the Princess' room. 


The polka-dots were used on her window seat.  You can see that post here


The other print was used on her headboard (post to come.)  If you look closely at the headboard fabric, you'll notice that it has blue in it.  We loved the pretty cornflower blue, so we chose that as the color to liven up those tired pieces of furniture.

Cornflower Blue by Martha Stewart

Here is the bedside table before.  Pretty in white, but not what we needed for the new room design.
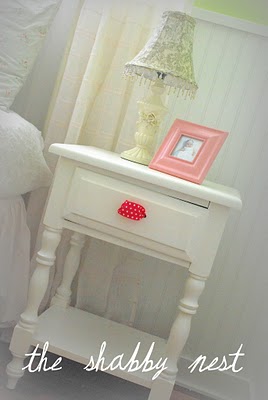


And here is the after...loving the color. But what to do about the missing handle?


You see, the original handle wasn't a standard size, and it has long since been lost (not to mention that it was quite dated to begin with.)  So my makeshift solution was using a ribbon in place of the handle.

For this makeover, however, I thought a little bling was in order, so instead of replacing the ribbon, I used an old bracelet of mine whose clasp had broken. 


The pretty crystals were just what the little table needed.  I just love the little bit of bling that they add. (Perfect for a Princess.) Not to mention that fact that I love finding a new use for sentimental jewelry I can't part with - even though I can't wear it anymore.


Have a nice day~

Wednesday, September 21, 2011

A Dresser For The Boys' Room~

Well, we're one step closer to finishing the boys' bedroom.  Because yesterday I was able to put the final touches on a dresser we redid for Boy #1.

The dresser is very well made, and a good size.  The problem?  Well, let's just say this circa 1970's piece was both a little too feminine, and well, it was.....kind of....um....how do I put this nicely?   The finish was kind of....less than attractive.  (And the hubby, bless his heart, had already taken out all the drawers and started sanding the dresser, when I caught him and told him I had to take some BEFORE pics.)


After sanding off the strange shiny finish, the hubby took some of his woodworking tools...


 and removed the floral embellishments.


Then we sanded it some more and primed it.  And after the primer dried, I went to work painting it an awesome olive-y green.  Olive Moss by Benjamin Moore to be exact.


Once I got the dresser painted, I replaced the hardware - which had a "lovely" brassy floral look to it - with clean brushed nickle knobs.  And here she is in all of her finished glory. 


Lovin' it!  And it will add a great punch of color to the boys' room.  Getting close to finishing...can't wait to show you the whole room!  only a couple of projects left...pinky promise.

Linking to Before and After at Thrifty Decor Chick!

Tuesday, February 15, 2011

Lighten Up - part 2~

Yesterday I shared with you step 1 in my plan to lighten and brighten this little corner of our dining area. Today we're moving on from the lamp to the little buffet it sits on.

This buffet was pretty in black, but it sucked up all the light in that corner of the room, and with our large chalkboard on the adjacent wall...there was altogether too much black going on over there.

I had been thinking and thinking about what color to paint this buffet, but I was coming up dry. That is until we painted the pretty blue dresser for the living room. "Aha!" thought I. Blue is the answer. Now lest you think that I am going to have painted-blue-furniture overkill going on in my house...let me just say that the rooms are adjacent, but the pieces are far enough from one another that they just help to carry a color scheme from room to room rather than seeming matchy-matchy.

So I painted the little buffet Cafe Blue by Valspar in semi-gloss. I. love. it.

There are about 124802384092809482340 tutorials on how to paint furniture floating around cyberspace...and since I don't claim to be an expert on the matter, I'm not going to add another one. I will give you a couple of pointers that I've learned along the way, however.

1. Primer is your friend! As you can see, I took this piece from a darker color to a lighter color. To make the transition easier, I started off with a coat of Kilz primer. The blue paint took much easier this way, and I only needed 2 coats. (If you've ever tried to paint over black, you'll know that 2 coats doesn't usually work.)

2. NEVER accessorize a piece of furniture until it has had a full 24 (and usually more like 48) hours to cure and dry. You will inevitably have a patch of paint that peels up if you do. Even if you used primer. It always makes me wonder when I watch those one-day makeover shows where they paint the walls and the furniture and then accessorize everything. I'm sure the homeowners end up having to do a lot of touch-ups after that!

3. Don't be afraid to try a color. If you don't like it, you can always repaint. That's the beauty of paint!

So here is the space as it stands now. I've given you a little run down of my plans.


Looking at this photo with my plans all spelled out on it, I wanted to share a little more "wisdom" (if you can consider me wise.) So here's another little something to keep in mind. Don't worry if your original plan has to be altered a bit. I say that I will "most likely" put plates on the wall. And I "most likely" will. But that could change. Sometimes things can work on paper, and then when you see them in real life, you realize that it just doesn't look the way you thought it would. And that's part of the fun of designing. Letting the space be your guide. Go in with a plan, but don't be glued to it. And then you'll end up with a space you really love.
I'm hoping to get to the accessorizing step this week...so look for Part 3 to come soon.
Have a great day~

Tuesday, February 1, 2011

Cutesy-Country to Ooh-la-la! A Bench Makeover~

A while ago I showed you this bench. My dad made it for me back in the late 80's or early 90's. I was big into the country look at that point, so I asked him to put that oh-so-cute heart cutout in the back.
Fast forward 20 years (yikes...am I really that old?) and I'm not so into the country look anymore. But the bench is sentimental... and I wanted to use it.

So here's what I did.

First, I painted it a fab aqua. (Milk Pail by Marth Stewart).

But darn it! There's still that cutesy heart cut out.

Then I remembered this wall hanging/plaster-plaque-replica-thingy (that's the technical term) I had in my decor stash. And it was just the right size to cover that heart cutout. So I painted it out in Milk Pail as well.


Then I performed a bench to plaster-plaque marriage ceremony which consisted of attaching the plaque to the bench with a couple of wood-screws (it already had hanging holes on its back.) Just hung it on there and VOILA!


A French-ish beauty of bench!


This pretty little bench will be sitting under the silhouettes I shared yesterday. Anyone guess yet what that area is going to be?


Linking up....

The Lettered Cottage

Have a great day~

Sunday, January 9, 2011

Furniture to match my blog: A dresser redo~

I have been wanting to switch up the living room for quite a while. I really, really, really, really, really times 10 to the 3rd power wanted to add in the color blue. The color of my blog...okay, that's not the reason...but don't you think it's nice for your blog to match your decor? Ha! Alas, our rug (which was lovely and in great shape) was all in warm shades of gold, red and brown. But then, as you may recall, the Princess was sick in the living room. Gross. But serendipitous in a way.

We *had* to replace that rug, so for Christmas the hubby and I pooled our gift money and bought a new rug. Pretty and neutral.


NEW RUG


Then the fireworks began. With a new neutral rug, my decorating-obsessed self was free to make some switcheroos.

I am lucky to have a hubby that loves decor *almost* as much as I do. He is really open to my suggestions of change. And very helpful as well. So when I told him I wanted to switch around the living room and add some blue...he was game.


Enter this pretty little $25 dresser. Yep! $25. It was an aweful minty shade of green. (Doesn't look quite as minty or aweful in this photo.) But it had pretty lines. And, did I mention it was only $25?!?


DRESSER BEFORE (the hubby had already started removing the knobs...bless him...he's not a blogger, afterall...but he did stick the drawers back in and even took the before photo for me.)


I told the hubby I wanted to put it in the living room...and I wanted it to be blue. He agreed. And even volunteered to do the painting since I am currently bogged down with other stuff.

Here comes the tricky part. We wanted to find the perfect shade of blue. So I emailed this sweet lady who has a fabulous dresser in a delightful shade of blue. And off we went to Lowe's to get the paint. Alas, it was not quite the right shade for our decor. So we had them lighten it to 75%...brought it home...painted the dresser...still not right.

Then I pulled out some pretty throw pillows we had in the master bedroom and asked the hubby if he thought their color might work. A nice grey-ish french blue. He loved it. So off we went to Lowe's again...pillow sham in hand... and found the perfect blue. Cafe blue by Valspar in semi-gloss.


And the hubby (injured leg and all) painted the dresser yet again. We switched out the knobs for some fabulous clearance versions (again from Lowe's) and VOILA! The perfect addition to our living room makeover.


Here she is in all her glory.
DRESSER AFTER


(And what French Blue dresser would be complete without a little Le Tour Eiffel?)


Of course...when you add a blue dresser to the living room...you have to shift furniture...paint other furniture...switch up the accessories...switch the slipcover on the sofa...etc. etc. I'll show you all the rest of the changes just as soon as I figure out what to do with the curtains. They are in dire need of a little spruce up! But for now...I'm sure loving that blue dresser!


xoxo
Wendy

Thursday, June 3, 2010

Frugal Friday~

In one of my posts about the Tween bedroom I'm doing for Mr. One, I asked your expert opinion about how I should refinish his dresser. I already knew what I wanted to do, so I was really just looking for validation from my infallible readers. And you all came through for me. I think it was pretty much a unanimous vote that I should paint the dresser gray. So paint it gray I did. I pulled out the same dove gray color we used for the headboard in our master bedroom (Ralph Lauren's Moonlight) and went to town.


I have been wanting a dresser for the other side of the bed to balance it out. Then I remembered that we had a dresser sitting in storage not holding much of anything. So I found other places for the not-much-of-anything stuff, and finished the funny little dresser the same way I finished the first. Because this dresser had horrible rectangular knobs, I went to my local Tar-jay and purchased some great oil-rubbed bronze oval knobs. They really make both dressers look perfect...more tailored.


Now, keep in mind, I still have to style the room, but wouldn't you agree, that the two dressers look fabulous? (If I do say so myself.)


Now it's your turn...

You know "da rules"...

1. Link directly to your post and not just to your blog.
2. Please link back to the Shabby Nest so others can share in the frugal goodness.
3. Comment, COmMenT, COMMENT! Please show our participants the love!


Monday, May 3, 2010

Linky Love~

Isn't blogland an amazing place? I just love Frugal Fridays! The amount of talent out there in our little corner of cyberspace is inspiring!!


Here are just a few of the fabulous frugal ideas from last week's linky party...


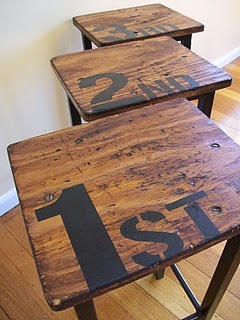
The Painted Hive shared an adorable vintage stool makeover. You know I just can't resist furniture with numbers on it. These stools are so cute!


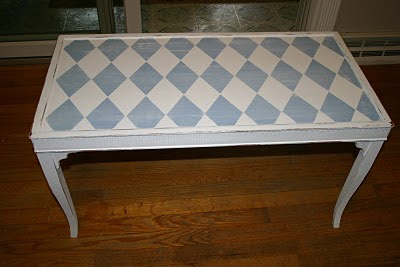
I loved this table makeover from Primitive and Proper! So graphic and fun...and the colors are perfect!!


A new use for painter's drop cloths....a painted canvas rug. This clever idea was shared by Less Than Perfect Life of Bliss.


Design Life shared a pretty nursery done on a budget.


And this is just the tip of the iceberg, folks! If you haven't had a chance yet, scroll down and check out the other wonderful frugal projects and finds!


Have a great day~

Thursday, April 29, 2010

Frugal Friday~

Hello, my dear readers. I was very glad to find out yesterday, that I am not the only one who suffers from Design ADD!! Your comments had me cracking up! If you don't know what I'm talking about, click here to find out if you too suffer from Design ADD ( apparently it is a very common ailment around these parts.)

Now on to the subject at hand...welcome to this week's edition of Frugal Friday! Today I wanted to share with you my console makeover. If you caught my Blog Parade of Homes post earlier this week, you saw the photos of our in-progress living room. (If you didn't get to see this post click here.) I mentioned that I was going to revive the console with a coat of paint...but I wasn't sure on a color. I was debating between a dark taupe and an olive green. Well, the taupe won. It's a color found in the room's area rug, and I thought it made a nice sophisticated but neutral addition to the room's palette.


So without further ado (is that how you spell it?) here is the console before...


And here is the after...


I ADORE IT!!! The color is Better Homes and Garden's Mink Brown. It really perked up the old console. I never could bring myself to like the console's wood. (But it was a freebie, so what's a Frugal OCD - obsessively consumed with decorating- girl to do?) It was too "rustic" for me, and not in a good way. Now it looks classic and sophisticated and even the funny hardware looks nice. It was a good call! (Now I'm on the lookout for a coffee table to paint the same color.)

mmmmmmmmmmmm. Much better.


Your turn!

You know "da rules"...


1. Please link directly to your post, knot just to your blog.
2. Please link back to the Shabby Nest so others can enjoy the frugal goodness.
3. Comment, Comment, Comment...show our participants "the love"!


Sunday, April 11, 2010

Found storage~

I love nothing more than finding something for free and making it work in my home.


I was lucky enough to find this dresser on the curb...in tact...and in pretty decent shape to boot. When I first got it home, I painted it black. It sat like this for some time before I decided I just didn't like the black. (Well, truth be told...in this photo the black paint had really taken a beating as well...it had to be redone one way or another.)


So I decided to give my free little dresser a makeover. I painted it a lovely robin's egg blue and added one of my favorite details...numbers...to each drawer. You can read all about how I revived this little dresser here.


A little while later, I was lucky enough to happen upon another dresser on the curb. This dresser was in pretty sad shape, but it had a couple of drawers that looked pretty good, and the detailing was lovely, so I rescued the two drawers and brought them home.


I painted one with a single coat of white paint. I purposely didn't give the drawer more than one coat because I wanted it to look aged. I painted over the lock as well but then sanded it down to emphasize the pretty details. You can read all about how I repurposed the drawer here. It's sister sat in the "before" state until I finally got my act together this last week, and refinished it in the same way as the first.


Since the pulls on the drawers were a little worse for the wear, I added some fun ribbon in a brown polka dot.


With an open closet like this one, the storage has to not only be functional...it has to be attractive. Adding the sweet numbered dresser and the two rehabbed drawers, creates storage with personality befitting my fun boys' sock monkey bedroom. Thank heavens for found dressers!!


I've got lots of fun decorating projects coming up in the near future...so STAY TUNED!!
Have a great day~

Monday, April 5, 2010

Painted, Facebooked, and Ohdeedohed~

First up...I painted my green buffet white. I know...I know. Some of you are going to be very mad at me. I tried to live with the pretty green in our new house. Honestly I did. And it simply did not work. I couldn't take it anymore. Well, that, and the fact that if you saw the piece up close, it was looking very worse for the wear. We purchased it with the green paint job, and the man who had refinished it? Well, let's just say that he didn't do the best job. It was chipping like crazy.

BEFORE (pretty in our old house):

So the hubby gave it a good sanding, then I pulled out the white paint and set to work. I'll be honest with you. I don't really like to paint that much. But what I do like is the almost instant gratification I get from it. The furniture (or room) transforms so quickly right before my eyes...like magic.


AFTER (pretty in our new house):

And now that this pretty piece is white...it is like magic! It brightened up the space...and it looks so clean and fresh and spring-y. It makes me happy! Now for a little accessory tweaking...but that's another post.


Next up, you can now find The Shabby Nest on Facebook!! And I need some fans! Yes I do. I've placed a Shabby Nest fan box over on my sidebar. If you feel so inclined, I'd love to have you as a fan on Facebook!! Yes I would!


Finally, for those of you who haven't seen my mini-mudroom, (there are some of you out there right?) Ohdeedoh ran a fun feature on it yesterday. You can find it here.


With the busy Easter weekend, and now spring break upon us, I'm still making my way through all the fabulous Frugal Friday links from last week...so look for Linky Love comin' up soon.


And don't forget to go vote for the week 6 challenge at So You Think You Can Decorate! I can use all the votes I can get. ;-)

Have a great day~

Monday, November 2, 2009

What to do with that repurposed dresser drawer~

Okay, I promised to tell you all what I did with that dresser drawer that I refinished for last week's Frugal Friday. Well, I have a confession to make. The reason I didn't share it with you last Friday, was because I was second guessing my original intention.


When I first decided to save this drawer from the trash heap, I thought that it would make a nice underbed box to store the Princess' huge collection of stuffed animals.


But after I saw how cute the drawer turned out, I began to question hiding it underneath a bed.


As these things sometimes work out, however, the drawer ended up being just a bit too tall to actually fit underneath the Princess' bed. ( You can't really tell that well in the photo, but the drawer doesn't clear the bedframe by a mere 1/2").


So what did I decide to do with this little pretty? Well, I had many wonderful suggestions from my creative readers. One of my favorites (and one that had occurred to me as well) was to fill the drawer with fluffy towels and put in the bathroom. I absolutely would have done this...if my bathroom had anywhere to display it. No such luck.


Instead, I loaded it up with some of my favorite cozy quilts and placed it under the green buffet in my living room. Perfect for the upcoming cold winter weather. I must admit, after looking at the photo, I'm not completely sold on it. I decided that since height is no longer a factor for the little drawer...it could really use some casters or maybe some bun feet to give it a little lift. The scale is just a little off...it looks...well...it looks like a drawer sitting on the ground. I love it, but it definitely needs a little something. What do you think?


Have a great Tuesday~

Wednesday, September 16, 2009

How to revive a dresser~

I've had this little black dresser in my upstairs hallway for a couple of years now. I loved the black, but the dresser was looking a little worse for the wear, and I really wanted to lighten it up.


I took a clue from these little egg prints that hang above the dresser and decided to paint it blue. I matched the paint to the background of the prints.


And. I. hated. it.

I wasn't sure what to do. Repaint? Choose a different color? Well, I decided to try to age the color a little bit so that it better matched the egg prints. I went and bought a small tube of acrylic paint in Burnt Umber. I watered it down (a lot) and then brushed the wash over the entire dresser, wiping off the excess as I went.


It brought the color down a notch and made it look a little worn. Much. better. But, I had more plans for this little dresser. I wanted to add numbers to each drawer (of course I did!) Now, I have tried many different ways of painting numbers on furniture, but this time I decided to use this idea from Layla. It worked great!


I didn't want the white to be too bright, so I toned it down with some burnt umber as well, and then painted the little numbers right on each drawer. I just love the finished product.


Here she is in all her glory. (The color is a little off in these photos....my walls are not nearly that orange, and the dresser isn't nearly that powder-blue...but you all get the idea, right?)


Now I've fallen in love with this little piece all over again! Hooray for a little paint!

I'm linking to DIY day over at A Soft Place to Land.
Oh, and join me over at Blissfully Domestic where I'm talking about how to create chic and fun canopy beds on a budget!

Have a great Thursday~