Showing posts with label front entry. Show all posts

Thursday, October 29, 2009

A dresser gets a little bling

I was so excited when I came across a bunch of house numbers at the thrift!


I started running through the house wondering where I could find a good home for them.


One place was the headboard turned towel rack. But where to use the rest?!? And then it came to me. I ran for the glaze and drill and the rest is history.


My salvaged $5 dresser from someone's barn in some weird shade of pink...


... recieved a fresh coat of white paint a few months ago. Lovely already! I just love the lines.


I took a sander to the edges for a bit of distressing for extra character. Not bad. I lived with this for quite awhile. Until I got the numbers. :)


I added a very small amount of glaze for further aging, and gave the little dresser some bling!


Notice how the glaze really warmed up the white? Yet it's still white. I am in love with glazing! I'll be doing a tutorial on how I glaze at a later date as this post will be long enough.


And the dresser got further dressed up with a canning jar hugging heart shaped rocks from our summer camping trip...


... with lots of texture in layers of course... the top is a mirror, 2nd is a galvanized framed mirror and the 3rd is an old barn window.


... and a little smattering of burlap. The platters make a wonderful key/loose change drop area.


The 'already ok but a little sleepy' before...


... to the dramatically enhanced after. The small changes of glazing and numbers made such an impact! It doesn't just feel like a lil' ol' plainted dresser any longer. It's now a 'feature.'

It's another one of those projects that makes me grin when I walk by. This dresser has spunk!


The dresser is on the left in this front entry.

Tip: Push it one level more.

As a graphic designer, I know about the rule to do something nice, but attempt to push things one more level. You can do this with virtually any project. Think a little outside the box, and your regular painted feature can become a piece of art with the smallest of details.


Dressers are like Barbie Dolls. You can redress them over and over again just because you can. And maybe even because designers are a tad anal... sigh.. I'm totally walking away from it for awhile. Thanks Survivor, for saving me tonight!

This post is shared with:


Thrifty Decor Chick's Before and After party


Sunday, July 26, 2009

Tile floor complete! - final reveal of the front entry

Oh my goodness... I'm so happy to report, my front entry tile is now complete!!


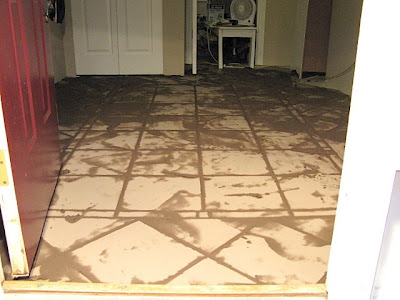
This was just last night while the grout was going on. THE GROUT! I've waited forever for this moment. The dog clung to me pretty tight as a thunderstorm was breaking through the sky. And yup, she stayed put just like you see here in the pic. Good girl!

All nice and grouted. Now the wait. Once it dries abit, I scraped it as clean as possible to remove as much access grout as possible, because the next job is twice as difficult if you don't do this. (and yes, I learned the hard way)


The floor comes to life! And this is a proud moment, for you can finally see how nicely (or how not so nicely) you've made all your cuts and joins. It's like icing on a cake!

I chose a pattern for the front entry. I designed and implemented the center first, then had the bias tile wrap around the center pattern. It turned out awesome! I love how all the apparatus in the room sits on the bias, and the pattern is free and clear. It's a neat visual.

What was once this... (which is actually an improved before believe it or not)

Is now the bright clean and ultra productive space we enjoy. With floor intact!

Some of you may have discovered I started blogging when my house was being renovated on. We're talking pulling out major walls, ripping up floors, new windows, the works. What I've been attempting to do was blog about the finished decorating type results on this blog. To see abit more writeup on the entry building and tile floors, you can spec out:

Our Extreme Home Makeover Experience - front entry
Funky Junk Interiors - all front entry posts

There's abit of repeat between the two blogs, however the building of the rooms of my home are better portrayed in the other blog.

Ahhh.... Sunday, a day of rest, yes? I'm going to go downstairs with a cup of freshly brewed coffee and admire my newly finished floor. :) (admit it, you would too!!

______________________

The FRONT ENTRY label has been shared with these two wonderful blogs ~

Flea Market Style's flea market find linky party, in Oct 2009.
Mustard Seed Creation's Furniture Feature Friday, Oct 2009.

Saturday, June 13, 2009

The front entry - Part 2 - Horse gate for coats


I wanted to finish my entry with a slightly unusual twist. I knew I needed coat hooks and a bench at the very least. So I waited until I found just the right 'stuff.' The room simply developed around what I found.

Part One is here. Welcome to Part Two! But I'll do abit of recap anyway with the finds.


So, I scooped up an old horse gate for free from someone's burn pile. Complete with authentic horse bites.


And then found this ugly $15 bench that was prefabbed to go inside a truck.


Put together, this little area creates a unique and productive front entry! Loads of hooks for coats and even more room to stash those shoes.


The hooks you see above are new, but they have an old wrought iron look to them. I fell in love with them instantly but had to buy boards they were already attached to. But no worries, buying hooks that way was unbelievably cheaper than purchasing them separate. Hooks were found at Rona in Canada. Home Depot carried them separately but were out of stock.


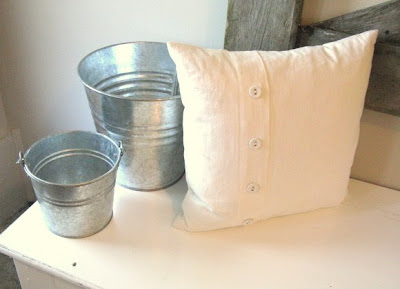
The galvanized buckets are ready for quick drop offs or pick ups to and from the vehicle. The cute white pillow is from a local thrift just yesterday.


Another dumping ground for bigger stuff. Right now this little box holds my cordless drill, bank misc., a hockey ball, a bag of screws... just general clutter that gathers at the front door in my house. The LADY tag is an old original cow sign from my parent's farm.


Neglected little $5 dresser that was once used in a barn...


... recieved a fresh coat of white paint...


... along with a little distressing. However it didn't stay like this for long.


Update: Oct 2009 - this is how the dresser looks now. :) A thin coat of glaze and some jewellry (random house numbers) morph a plain dresser into a room feature!


The layered platters make a wonderful key drop area.


How about a little art in the room? This wreath wrapped in ivy is being held onto a door with a plate hanger.

I smile when I look at these. My buddy Vic yanked these window frames off an old barn and knew I'd figure out something to do with them. He was so right! I adore the outcome. Inside the frames are CNC routered samples I've painted up.


Before.


After.

Part 3 - tile floor HERE.

The room is now light and airy, and ultra productive!

A few more finishing touches are in the works like the (eeep!) tile floor I need to finish, some new lighting and possibly some sheers to cover the two little windows on either side of the door, because one of the windows is cracked. I'll no doubt eventually find something that will work perfectly one day.

What do you have at your front entry? Are you a closet gal or are you a hook fanatic like me?
_______________________

~ this post is shared with ~

Pretty Organized Palace is having a 'dresser party!' You must go check this out! They make my dresser look like a big yawnfest. :)

Join Kimm at Reinvented for her Trash to Treasure Tuesday June 16 2009 edition. Check out what beauty others are creating out of... I can't say the T word. No way.

Kimba at A Soft Place To Land is having a DIY July 22 party! With a fabulous postage stamp pillow prize! I LOVE that pillow! Oh please oh please oh please...


Sunday, May 31, 2009

The front entry - Part One

I am soooo impatient! I always thought it was a joke to hear someone say they'd rather watch paint dry. But here I am actually doing it! I need a life...


See this awesome find? It's an old horse gate that I captured for free before it was taken to a burn pile. This is going to be mounted on the wall with hooks for coats. The chew marks are indeed staying. Character built right in!


This is not a fancy two-tone effect. This is how yellowed the doors were in the entry. Wow. So I went to town (literally, to get paint) and painted everything in sight. My new mission - one room at a time so I'm not dapping or painting for months on end. This is more fun! Shake it up abit if you will.


Everything, I mean everything got hit with white. I have a vision!


This sorry little dresser with great lines I might add, I scooped up for $5 from a garage sale a few weeks back.


So fresh and pretty now! This dresser will come in soooo handy for mitts and hats and keys and mail and whatever you find accumulating at front door entries.

This hugely long bench I found for $15 at a garage sale. It was fabricated to fit inside a truck of all things and there were two, one for each side. See that weird little cut thing on the left? I chose this bench so the cut thing on the left would be hidden behind the front door. The other bench had the cut thing on the right. Ain't I clever.

This bench is about 7 feet long if you go by the tiles in the pic. It's massive and perfect for what I have in mind! But ugly. The ugliest grey ever. The kind of beat up grey you may see on an overused ice rink bench maybe. Never mind, I know how to fix that. As much as I would have loved a beautifully lined vintage bench (with a vintage price to match no doubt), when I saw this, I knew I could make it work.


You can't see it all here, but at least you can spot I've cleaned it up some and it sparkles with everything else going on.

And now I must wait for the paint to dry. Grrr... Last night I was in a hurry to set up the room and ended up repainting the top of the dresser again. Ever layer wet paint on semi wet paint? Know what happens? Your curing time has morphed from hours to days. Serves me right for not just going to bed already instead of decorating too soon.

I'll be working on the tiling too, so I'll report in how I'm going about that. I'm not taking an easy route there so that's why I procrastinate so badly with all things relating to tile. I'm my own worst enemy at times, but I thrive to try new things and patterns. I'm betting a few of you get that, no?

This week I'll pick up some hooks and install the gate. (can't wait! coats on hangers gets so old and is waaaay too much work for this busy household)

So, stay tuned for Part Two of the entry way coming to a monitor near you shortly!

And tell me. Am I the only one here that rocks back and forth glaring at the curing furniture with accessories in hand WAITING for the moment the timer for curing goes off and I can race and stage it all? Sigh... I think I need more friends.

Edited to add:

I have thought of the BEST way to cure paint... put a fan on it. wow... I'll be decorating in no time at this rate!