Tuesday, August 31, 2010

The Silhouette Winner and an Update on The Hubby~

First of all, I wanted to thank each and every one of you for your heartfelt comments on yesterday's post, and for the prayers that I can feel lifting me and my family up during this very difficult time.

I had many readers who asked me to please keep you updated on John's condition, so I will get to that in a minute.

But before I do, I want to announce the winner of the Silhouette giveway. There were well over 1800!! comments on this giveaway...you all love you a Silhouette...and I really can't blame you. But the winner according to Random.org is #1137 Aimee Jensen of Aimee Jensen photography. Congratulations Aimee! Please email me and I'll get you set up with your prize.

Now for an update on the Hubby. Yesterday morning, I went to the impound yard where they had towed the remains of our car. It was completely totalled. I was struck again by the realization of just how blessed we are that he survived the crash. And for those of you that wondered, it was a single vehicle accident - he fell asleep at the wheel - so (more blessings) no one else was injured.

After that, I went to see him at the hospital, and it was the first time I had been able to talk to him since the accident. Despite the fact that it was distorted by his severe pain, I was just so grateful to be able to hear his voice! He has several broken ribs and a collapsed lung. His right leg was fractured in several places including his hip, but the surgery from the previous night went well, so his doctors are hopeful that they were able to save his hip and prevent the need for a hip replacement, although that remains to be seen.

He will be in recovery for months, but his prognosis is good and for that I am entirely grateful. I can't express enough my gratitude for your prayers on our behalf. I know that they were heard.

Late in the afternoon, however, my mother called with the news that my father had fallen off a ladder while trying to cut a limb off a tree in their backyard, and had broken his hip. He goes in for hip replacement surgery today. So, although I avoided the anxiety of hip replacement surgery with my husband, I now have to face it with my father. Life is bittersweet. The good with the bad. Being a grown-up certainly comes with unending worry, does it not?

So on I go, dealing with life one day at a time, as do we all. It feels like it is always an uphill climb, but I'm sure once I reach the summit, the view from the top will be well worth the effort of the hike.


xoxo
Wendy

Today I'm Being Interviewed At BluLabel Bungalow


Today Erika, from the stylish blog BluLabel Bungalow, is featuring me in her Tastemaker Tuesday series. In the interview we discuss the parallels between fashion and interior design, and how my experience in both fashion and art influence my approach to interiors.

Click here to read the interview and come back tomorrow to see what became of this fabulous fabric!


I was supposed to announce the winner of the Silhouette giveaway today, but I've had a family emergency. John (aka The Hubby) was in a terrible car accident yesterday. One that they say he should not have walked away from. Due to blessings from Heaven, he survived. But he is seriously injured. He underwent 6 hours of surgery last night, and will require weeks if not months of healing. Needless to say, I needed to be with my family yesterday. I know that you all understand.


I hope to announce the winner tomorrow, after I get my bearings. It's amazing and scary how quickly things in this life can change. And it's amazing how something like this puts my love for my husband and children into sharp focus.


Thank you for being wonderful readers, and friends. I want to ask a favor of you because I know that our little corner of the www is amazing and loving...please remember John in your prayers...and please remember my children as well.


Much love,

Wendy


Monday, August 30, 2010

My heart is full

I truly cannot thank you enough for your incredible comments and emails over the weekend and today. I’m humbled and so grateful for of your prayers and thoughts. Each and every comment made my weekend.

The past few days have been filled with so much sadness, but SO MUCH joy and love as well. Our friends and family have gathered around us with real and virtual hugs – YOU included. It always amazes me how I can feel so much love at such a sad time – but that’s what it’s all about isn’t it? Celebrating how someone lived and realizing what we have to live for.

I don’t how else to express my gratitude but to just say THANK YOU from the bottom of our hearts. I mean that – each and every one of you are a blessing to us.

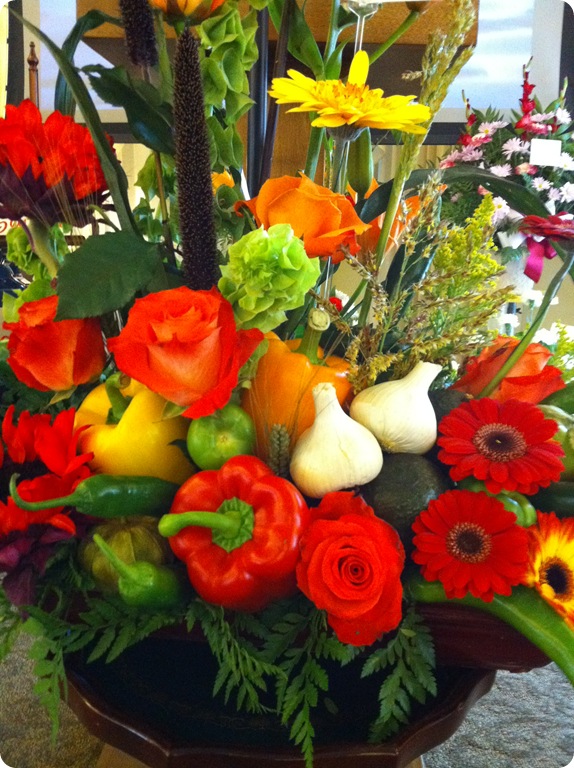
Tonight, I leave you with one of the bouquets that the staff at hubby’s school sent:

photo

Beautiful right? But do you see the extra special additions? Garlic, avocado, chilies and peppers – some of my father-in-laws favorite ingredients! Absolutely unique and stunning. He brought so much joy to those he cooked for. PERFECT. :)

Thanks again so much. This weekend has inspired me many ways – I’ll show you one way tomorrow. :)

A Creative Lampshade Idea ~ Compliments of Isabella

Isabella was apparently paying attention when I recovered a lampshade or two during the past year. Here is her interpretation of how to cover a lampshade with fabric.


After Isabella asked if she could have an unused lampshade, the next thing I knew she had pulled out a bag of remnant fabrics and another bag full of trims. Then using fabric glue and a pair of scissors she went to work. From that point on I wasn't paying attention. If she was happy and busy, with Max playing with Lego's next to her, I was going to grab this quiet moment and get a little work done!


When she called me in to take a look at the length of fabric that had been pieced together, and wrapped it around the shade, I was certainly impressed by her creativity. Now this is a brilliant idea! Why hadn't I come up with this?


It was fun helping Isabella attach the patchwork of fabric to the shade, using my new favorite gadget...a glue gun. Afterwards she finished the project by securing trim around the top of the shade with fabric glue. I just completely adore the finished shade. I know, I'm being such a mom!!


Not very visible in the photo, Isabella wrote "M a x" on one side of the shade with fabric paint. She explained the shade was designed, with Max's approval and imput, to be placed on a lamp in his room. (I tell you, I will have to remind them who the designer is around here!)


(duvet and headboard fabrics ~ girl's dream bedroom)

(slipcover & lampshade trim ~ big boys bedroom & master bedroom)


This is my favorite side of the shade. The fabric shown at the center was used to recover a client's dining room chairs. She happened to stop by the day the lampshade was sitting here on the console lamp, immediately recognized her fabric and thought the whole thing was just great!

(island pendant fixture fabric ~ kitchen redesign)

(pillow fabric ~ living room redesign)


(message board fabric ~ girl's dream bedroom)


I just love being inspired by interesting design, and how cool is it when that source ends up being your own daughter. LOVE!

Don't be surprised if you see a patchwork lampshade show up in a future design of mine...

Sunday, August 29, 2010

The pallet desk project - Part 6, the BIG reveal!


~ The Pallet Desk Project ~

(all parts to date here)


Today
 Part 6 - the big reaveal


Did you see part 5? It was also posted today, so don't miss out on how I did all the things you're about to see here.

So are ya ready?!?

~ This is where I blog ~

I was thrilled when I read about Kate's "Where do you blog?" party. It was the perfect motivation to concentrate on getting this series to a close. And guess what. I did it! :) Thanks Kate!


My blog office is located in our dining room. I LOVE blogging in this room because it's central to everything else that transpires in the household. There is no need to hide away in an office or bedroom and miss out on what the others are doing. I'm right here.


What makes this office extra special though, are all the elements I've surrounded myself with. I love everything on that floor to ceiling storage system. Every object inspires me!


 But what makes this post really special today is the fact that this long awaited funky table is now complete!

I desired a bigger table than what I had, as well as the top secret feature this desk hides. The 27" monitor is sunken into the desktop! This enables me to have my eyes level with the top of the screen, no longer looking up, which was really hard on my neck. ( see part 4 above )


And the build couldn't have been easier, especially for a non builder such as myself. Two sawhorses are the legs...


... and the old palette boards for the top were simply screwed onto the ladder framework below. I made no effort to hide the fact that a ladder was used because I thought it added an additional whimsical detail.  AND a place for the meat grinder pencil holder to sit of course. :)


Old palette boards were sanded and attached in a slightly random style to encapsulate the feel of someone gathering different boards over time, saving them up to create something special.  All the wood was left in it's natural state. The top of the desk will receive a matte finish in due time so it's extra cleanable.


No two boards are alike which is what makes them extra special. The odd white one was even thrown in for good eclectic measure.


Plenty of random screws, big bolts and stenciling just add to the gathered over time scrap look I was after. I felt the boards resembled railway ties in a way, hence the chosen words used for the stencil.


What's not to love, when you surround yourself with all the things you love?


I especially love the desk for the fact that it isn't fussy. The more wear the boards will no doubt receive, the better they'll look over time. If you start with something old, you get the look far faster than if you start with brand new.


Just so I don't miss out on any action, the desk was designed so my son could sit with his laptop right beside me. He wants to start a Lego/photography blog, so stay tuned for that one! I'd like to entice that artistic ability he has any way I can. And what better way to encourage/monitor his doings than having him right beside me? :)


And for those that know me well, it comes as no surprise that I'd incorporate my rusty gears and cogs into the mix on my side. :)


And this little bit of numerical fun changes every 5 minutes. I'll eventually figure it out. :)


Another thing I LOVE about blogging here are the double french doors I generally have wide open in the back. I can glance over and see the entire back yard and mountain view at any given moment, feel the wind and hear the giggle of happy kids doing their thing.


Blogging is a wonderful hobby, but this location makes it all the more special. :)


 When I moved in:


It turned out exactly the way I imagined it. And if I wish to freshen up the top, nothing a coat of white paint, distressed wouldn't cure. :)

Since this is part of a series on telling it like it is, it's safe to say I somewhat hesitate to hit that PUBLISH POST button.  Gaaa...  here we go again. Whoever said breaking new ground was easy?!?

Holding breath, taking the dive head first...

*click*


Part 5 on how I added the details was just posted today as well. Click HERE to get there.
Related posts:

The wall unit build is HERE.

The wall unit staging reveal is HERE.

The Palette Desk Project - Part 5, finishing details


~ The Palette Desk Project ~

(all parts to date here)


Today
 Part 5 - finishing details


I received an email from my artist friend Dan. He thought the table was cool, but enticed me to use random screws for attaching the palette boards to the ladder.

I thought of hiding the screws, gluing the boards, all kinds of options that were discussed with the Facebook crew. (thanks all!) And in the end, I resorted to not only the easy way, but the funkier way. Dan was right. Let's go to town! And that's when I dropped the perfectionism and hit the hardware store, bought a handful of this and that, and went crazy.

Remember the nail holes from when I pulled the nails out? I even put 'pretend' working nails and screws into them for added bling. :)

Tip: predrilling the holes created a much cleaner look, otherwise the wood tended to splinter abit


I had another windfall in the past week. I had been wishing I had all kinds of crazy giant bots and washers on hand so I could decorate the desk top even more. And this bucket is what I found at my fav palette shopping mall the very next day! Oy... I giggled the rest of the way home.


See?!? Tell me this isn't cool! Right then, I knew what I needed this desk top to look like. So I started drilling random holes slightly bigger than the screws, and simply dropped them in place.


And found other weird stuff in the bucket like that thing on the left. No idea what it is but it's staying! In case you're curious... I installed all the fancy stuff away from work zones and legs so they won't be in the way. And if they are, I can just pull them out for the timebeing.

 Next up was deciding how to decorate the boards via paint. The bolts, rustic boards and random screws just told me to leave the look as random planks nailed together. They resembled railway ties in a round about way, hence, the logo.


I was mildly inspired by this crate I found on the net, but wanted more colour than shown here. So I revamped the design to suit.


I created 2 toned decals. 

 The black went on first, then after it was dry (nearly), I applied another layer with white. 

FYI: I own pro signmaking equipment for my day job - CorelDraw, Signlab, and a 20" vinyl cutter and simply used old vinyl on hand 


Simple acrylic craft paint was all that was used. And I used a stipple motion for application so it left a mottled appearance from the get go.

Once I stenciled the design on the boards, I changed my mind on placement. Doh!!! After mild panic subsided, I simply unscrewed the boards and moved them where I desired. Now THAT was a brilliant move those screws were...


I then distressed the paint with a palm sander, proving to be effortless compared to doing it by hand. And had more fun with paint in other areas.


Once all the designwork was painted on, it was easy to see where embellishments would work, so I kept adding and adding.

What? The boy's hungry? Yeah, I got him to cook. I was busy workin' after all! :)


 Another detail I had already thought of but Dan also suggested was to not line the board edges up so perfect. He simply confirmed that it was a good idea. Remember the pic of my cat sitting on the  boards here? If you look along the edge, that's what I did although abit more subtle than what you see. I wanted it slightly random looking without a comical aspect.

Reveal time! Today as well!

Wow. We're finally down to reveal time! So I have a treat for ya. I've also got a Part 6 that will follow right after this post, so be sure to look for it. Not only did I want you to wait any longer, I also wanted to be a part of a blog party on "Where I Blog" so that little deadline really pushed me to get this all done. There is NOTHING like a deadline, folks! :)

See ya shortly over at:
Part 6 - the BIG reveal! (link is up HERE)


Thanks to the Facebookers that offered their helpful opinions during this project!
And they get teases sneak peeks too!