Thursday, July 31, 2008

Have a Seat in My Foyer

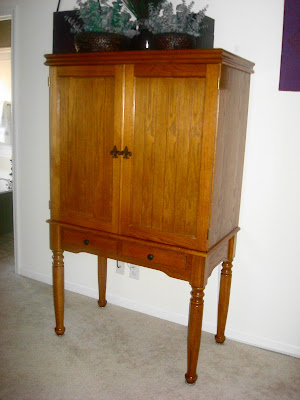
Look at my Pottery Barn chair. I snatched it up at a thrift store for three bucks a few months back. I had no clue where I'd put it, but who could pass up that price! When I got it home I noticed that one back leg had been broken, but it's been repaired well and is nice and solid.
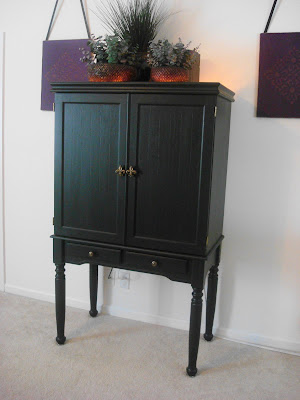
Last week after I moved my table into the foyer, the chair that was there looked out of place. So I washed the cover of my PB chair, and sanded and painted the legs black. Now it has a prominent place in my home.
While we're in my foyer, let me show you around. This area measures 8 feet by 11 feet. It's a great size, but there are doors and openings on every single wall, which makes it a bit of a challenge to decorate.This is the backside of my front door. When we moved here, there was a door and a separate long window. We replaced it with this door and side lights, which was a nightmare job for our poor carpenter. My hubby and I put up all the decorative molding. I really wanted to make a statement on this wall. We put lighting in the crown molding. It makes for a cozy light during the day, as well as at night.This little piece was on my doorstep one day. My neighbor was helping her daughter de-clutter and she thought I might like this. I do!
My hubby and I were given permission to remove this mail slot and elevator button from a very old hotel just before they demolished it years ago. Little kids always ask if my closet is an elevator. Wouldn't that be nice.
Well, that's it for today. But I'm thinking that my new chair needs a little something sitting right next to it, so I'm off to work on tomorrow's post.
Make it a good day!

Wednesday, July 30, 2008

Bouquet Abundance

In my ideal dream world, I would have a big decorating budget. Part of that budget would be used to fill my home with fresh bouquets. I think this dream is brought on by gazing at so many home design magazines. Isn't there a fresh bouquet in practically every photo?
Then it occurred to me. I could achieve my dream! I didn't need an unlimited supply of money. All I needed was a little creative thinking. I needed to think beyond the florist shop. Now I'm enjoying fresh bouquets throughout my home.
A bunch of cat tails freshly cut
from the side of the road,
while on a date with my husband.
A few fern fronds picked from my yard.An inexpensive flower bunch from the grocery store,
placed in several jars for more impact.
It just goes to show, that with a little creativity,
you can achieve your dreams!

Handmade books...

Two posts in one day? I know, but I just couldn't wait to show you all what I made! I'm in charge of a fun group at my church that we call "clever ladies". We get together once a month and learn a new craft. Well, this month a very talented friend of mine taught us how to make handmade books (I've been after her to teach us since I saw one of her books clear back in December). A little chipboard, some scrapbooking paper, and a whole lot of stick glue and VOILA! Check it out.


And here are the supplies all ready for another book I'm going to make for The Princess.


I'm going to make some of the these babies for Christmas gifts this year too! Here's to "clever ladies"!

Happy Crafting~

Collections

My mother is a collector. She collects just about everything. I'm not really a collector. But I do have a few smallish collections of things (well, a big collection of crafting supplies, photos, and home decor books - but those don't really count.) One thing my mother taught me is the art of displaying a collection. Here are a couple of my favorites at my nest...


These two jars sit together in my bathroom. Yes, in my bathroom. They each house a prized collection. The tall jar has my seashell collection. My family LOOOOOOVES the beach. Especially the beach in Maine. Pretty much any beach in Maine. I also love the color white. So most of the seashells are white...although I have thrown in a couple of random pieces of sea glass as well. (Sea glass is much harder to find than sea shells are). Oh, and a wishing stone. (Wishing stones are rocks with a ring of color in an unbroken circle all the way around. Make a wish on one then give it away and the wish will come true...I got mine from my cute sister-in-law in Maine who happened to find it on the beach.)

Then there is that cute little canning jar. A dear friend of mine gave it to me a couple of years ago for Christmas with some of her homemade jam inside. (mmmmm good stuff!) But I loved the shape of the jar so I had to find something to put in it. While visiting my mother, I scavenged some of her buttons - only the white ones. Don't they look pretty in the tiny jar.


I wish this was a better photo...but I used some of the prettiest white buttons to make this "wall art". The captions under each stack of buttons read "live", "laugh", "love". Simple.


I don't collect rocks. My kiddos do, but that's another story. I thought this jar should be included, however. This is our "rock jar". When the kiddos do an unexpected random act of kindness, Momma puts a rock in the jar. When the jar is full, the kiddos get a special treat. The kiddos must be on a roll, 'cause the jar is looking full! But, truthfully, I just wanted to show y'all how pretty it looks. The old canning jar came from The Hubby's grandmother's house. Filled with the stones, it makes a nice addition to the kitchen counter. Really it does.

How do you display your collections?~

Tuesday, July 29, 2008

This One's For You

Two posts in one day? Yep, cuz my blogging friend Shirlee wants some inspiration from a little project that she noticed in one of my previous posts.I bought this wooden clock face at the thrift store. It was someone's unfinished project. I brought it home, finished the paint job and distressed it, then added some big chunky ball feet. I use it to as an anchor for my vignettes.
I'm always willing to help out a friend. Good luck my friend!

Change With That Sale

Look what I found on the garden clearance!
Isn't it a fun accent?
Although I like the rusty finish, it doesn't match
the other garden accents in my front yard.

So there's just one thing to do---
get out the spray paint!

Can you guess which color?I like it even more now!
It's lost it's rustic qualities and has found it's elegance. It looks so nice on my front porch,
with the fake grass that I don't have to water.
It looks so nice that I'm feeling the need to change out my porch decor.
Doesn't this bouquet look summer-y?
I rescued that metal thing from someone's garbage pile.
I bought new pillows at the thrift store
for my old church bench.

And the frame came from there too.
The topiary is one of those items that gets moved
all around my house.
I need a rest from the heat of the summer
and they say "a change is as good as a rest"
.
I think they may be right!

My favorite spots

Thought I'd post a couple of pictures of some of my favorite spots in my house.


This console sits at the base of my stairs. I love it for it's serenity. The monochromatic color scheme is so soothing. The photos are black and white pictures of The Hubby and his brothers as children, and me, my 'lil sis, and my dad when I was about 5 - they are favorites of mine. I also love the reflection of the stairs in the mirror. Just don't look to close. You can see where Two took a toy truck and banged the drawers...he left a nice group of dents...at least I didn't have to repaint the piece.


"Really?" You're thinking. "This is one of your favorite spots. " Yes!!! I just love me a barn star! I really love the way the simple lines of the barn star and the bead board on the refrigerator surround play off of one another. I love bead board! You can't tell in this photo, but the walls are actually a sort of mossy green...Cathedral Gray by Ralph Lauren...but it really is green. I love the way the two greens play off of each other. Also, for this month at least, the calendar matches!!


I love this corner for all sorts of reason. First, I love the big, comfy chair. (It seriously is so comfortable...we got it at IKEA for cheap!!!) And, of course, I love the Toile pillow and the yellow, nubby fabric on the cute triangle pillow. (I found the toile at Walmart!? but all the other fabrics are from JoAnn's). The buffet is a rehabbed piece we found at a used furniture store. I use it to store toys and games, as well as a few of my larger serving pieces. And that mirror? That mirror is one of my favorite pieces in the whole house. There is a great furniture store not far from our house. A family runs it out of the barn behind thier house. They call it the Shabby Sheep. How cute is that? Anyway, the furniture is awesome. I usually just go there to drool. One day I took The Hubby with me, and he discovered this mirror. He had to have it. So it came home. And here it is. I love it! Have I mentioned before that The Hubby has excellent taste?


We have done so much work to our kitchen since we moved in (that is a post for another day). But this corner has to be one of my favorites. There used to be a random floating cabinet to the left of the window. The Hubby tore it out and we (and by we I mean The Hubby did everything while I "supervised") put up these wonderful shelves. They are a great place to store my glasses - and a couple of cute knick knacks! But then there was the issue of our Carbon Monoxide detector. It is a necessity, but soooo ugly. Luckily, we found this great plate rack at Christmas Tree Shop along with the plates and mugs. Put it in the unusable space behind our dumb split corner sink (something I will replace eventually) and it hides the detector. (This is why I put up both photos...from a distance you can hardly tell the detector is behind the plate stand. ) Also, I LOVE my phone - a perfect find from Pottery Barn.

These are some of my favorites. What are your favorite spaces in your home?

Monday, July 28, 2008

Table of Contents

Look at this lovely little table!
Can you guess what it's made from?Does the hole in the bottom corner give it away?For years it served as a short, four panel door
in someone's home.
It still has the original weathered stain.
I just stained it's top to match.
Don't you think it's a-door-able?

With some patience and $10.

So I did it the right way this time! We have an armoire that I have loathed forever...I almost dragged it out to the garage sale this year just because I am so over it. It has a very country feel to it that I just cannot stand anymore. But, turns out it's a really nice piece of furniture. And I REALLY didn't want to drop at least $600 on a new armoire.

So I decided to paint it...the right way. Started with primer, let it cure, and then three coats of black paint. This project only cost $10 for paint. The most important parts of this kind of project are using primer to start and letting each coat of paint dry fully. I painted the knobs (that I had replaced a while back in an effort to update the piece) with a bronze glaze and it makes them pop. I also filled in the grooves on the front of the doors so the beadboard wasn't quite so noticeable.

Here's the before:


Here's the after...


Black paint transforms just about anything!! It still has a bit of the country look it, but I think it looks so much better now.

Magnets


Jen...this one's for you.

My mother always says that ideas are like germs. They float around in the air, and all you have to do is catch them. I kind of think that is true. I felt like I was so original to come up with this idea, but since I made them I have seen the same idea cropping up all over the place. (No thanks to me, of course!)

They are a fun and easy project.


You need:

Glass beads: I like the large (1-1 1/2") size but you can use any size. I found mine in Target in the flowers and vases section. A whole bag only cost $4.99!

Scrapbook paper: or in the case of the bee magnets, I drew the image myself and photocopied it...shrank it, enlarged it etc. And the toile magnets are made with pieces of fabric...I love TOILE! And have I mentioned before how much I love BEES?

Scissors

Mod Podge: Of course!

Magnets: I use the round ones you can find at any craft store.

Hot Glue: To glue the magnets on the back.


The way I actually made them is by cutting the paper (or fabric) into squares just larger than the beads.

I put Mod Podge on the flat side of the bead and centered the image just where I wanted it (you can see the image even when the Mod Podge is not dry.)

I didn't put a coat of Mod Podge on the back of the paper although you certainly could, but I did coat the back of the fabric with Mod Podge.

After the Mod Podge was sufficiently dry, I cut around the edge of the bead trimming the paper (or fabric) as close as I could.

Then I hot glued on the magnets.

VOILA!

I have seen them made by layering on different papers etc. which can make them much fancier, but I usually make them with my kiddos and so try to keep it as simple as possible.

They make great gifts...this year we gave them to One's school teachers at the end of the year...to the Hubby, Grandpa and Papa for Father's day...and to my cute sister-in-law for her birthday.

Happy Crafting~

Friday, July 25, 2008

Update on the kitchen!

So I realized I never updated the progress from my island debacle in the kitchen. (My first post.) Turns out, it's held up really well (crossing all fingers) -- even with a toddler in the house. :) It really looks great, and the result is just what I wanted.

I was over all the cherry in the room -- the floors, cabinets, chairs, table and island:

I added some molding to the island and painted it black. Here are some final pics of the room:

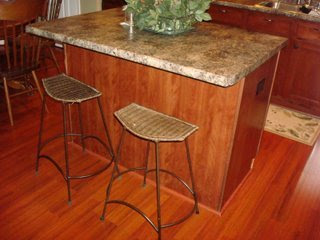
Along with the island change, I got new black chairs and now I'm thrilled with everything. (Six chairs were $290 at Garden Ridge -- HOLLA.)

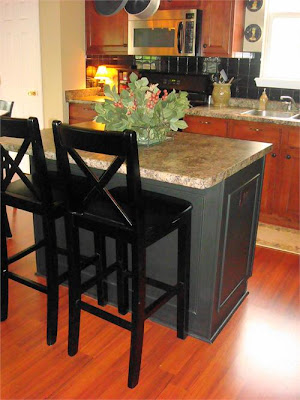
(The flash makes it look a little gray here.) Now I think I want to add some corbels to the island too, to give it a real furniture look. All in all, not too bad -- I feel like I transformed the look of the whole kitchen for less than $330. (That's for six new chairs, paint, and a little molding.)

The back door...


Since I have mentioned so much about our back door I thought I might post a few photos...

Where we live in the Northeast, it seems like most people actually use their back doors as the main entrance to their homes. This year I decided the little porch (and I mean little) needed some color, so I found this cute planter at Walmart (for something like $6) and planted some impatiens.
I'm not much of a gardner, but I do know impatiens like the shade. But my friend had actually given me these plants. They weren't in bloom, and they didn't have the little stick that tells you what they are, so I planted them and put them in a spot that gets full sun. They've actually done really well considering. They get a little wilty (is that a word?) during the heat of the day, but they always perk up again at night.


I love the porch lights. The Hubby picked them out to replace the brass lights that were here when we bought the place.

The last picture shows the planting bed that wraps around the front of the house to the back (well, it's really the side) door. I tried to add a little color this year. I love the pink. **Try not to notice the fact that my hosta is looking a little yellow - I'm not sure what's wrong with it.**
So there you have it...a little tour of my back door. (cute rhyme, huh?)

I Should Get a Commission

I promise you that I DO NOT work for the Rustoleum company or the Rub 'n Buff company---but maybe I should. Maybe I should show them all of my projects and then they could pay me a million dollars for my incredible ideas and then I could share it with all of you, since you're the ones who inspire me to create more and more projects. . . .Well, it's a great thought, right?
Here's my latest project:(sorry! the picture is dark)
I bought this lovely little statue at the thrift store for three dollars. It's beautiful as is, but I think that I know why it was donated. It's a bit top heavy, and easily tips over. There are some marks on the base that look like the previous owner may have weighted it down with a rock. It also has that verdigris finish that was very popular years ago, but not so much now. All of those problems can easily be fixed with a scrap of wood, a can of black spray paint, and a little R'nB in a copper color. With those little fix-ups, it's now updated,
and looks like this:
I identify with the birdy that chooses to do things
his own way.

Thursday, July 24, 2008

Baby food jars?


So having recently left the baby food stage, I had an overload of jars and decided that I should try and do something with them. So here are a couple of ideas...


Votive Holders : pop in a couple of tea lights and they look absolutely lovely. I personally prefer the simplicity of the plain jars, but they also look great dressed up with ribbon. Or you can get adventurous and use some fine guage wire wrapped around the neck of the jar to make hanging votives.


And here's a little project that's also fun to do with the kiddos...


Some tissue paper and a little Mod Podge and you can decorate the jars for every holiday imaginable. The young 'uns and I made these for Valentine's Day! See how pretty they look all lit up. (Make sure you pay attention to them when you have candles burning, however).


And finally, look at this fun little project I did after our first trip to the beach with One as a baby. I found little pictures of lighthouses and boats in magazines. Then I was lucky enough to find the words "first day at the beach". I decoupaged them to the lid using my favorite Mod Podge and put all of the shells we collected that day inside. Such a fun keepsake!

A Corner of My Home

This little wall measures just over two feet wide. It's at the end of a hall and surrounded by doors; a bathroom door, a bedroom door and a linen closet. This is an area that could easily be neglected. But why neglect a spot that my family walks by several times a day?
Sometimes we put a lot of effort decorating the areas of our home that visitors see and we forget about those small spots that are usually for our family's eyes only. Is there a little corner in your home, seen only by your family, that needs a little decorative touch?

Wednesday, July 23, 2008

Hooray for chalkboard paint!


The entryway just inside our backdoor was a hodge podge of closets when we moved in. We made our "wicked awesome" budbench out of one closet. We really needed the other one for a coat closet/broom closet so we left it. Problem was it was ugly. And I mean ugly. All of the doors in our house are hollow core cheapies. So the question was...how do we make them look better without replacing them? The answer for this door was chalkboard paint! Too bad this picture isn't better...as you can see the door is in a bit of an odd space...right next to the back door. (You can't open both doors at the same time.)

Now at least it looks cute, and it's functional too! Can't beat that. Add a cute little basket to hold the chalk and erasers and it makes a nice reminder board just before you leave the house. Truth is, I love chalkboards (I have them all over) and now I can't get enough of chalkboard paint. I've got all kinds of little projects planned for this great invention...I'm thinking flowerpots, boxes, the wall inside the boys closet (I'll explain that later)...the possibilities are endless. But, for now, I'm happy with my door.